
FROM YOUR FILE TO OUR PRINTING BENCH
How to size your image
for canvas printing
The right crop. Room for the edges. Enough detail for the size you want.
“What size should I make the file?” is one of the questions we hear most often. It usually comes with a few others: does it need to be 300 DPI, how much goes around the sides, and will the dog’s ears still be on the front?
You do not have to become a print technician to order a canvas from us. You can send the original photograph, choose the size and finish, and let us help with the preparation. But if you enjoy doing the artwork yourself, this guide explains the measurements from start to finish.
We will use a 20″ wide × 16″ high finished canvas for the main worked example. The same calculations work for smaller prints, portrait pictures and custom sizes. Every measurement is written as width × height.
START HERE
The quick answer: front size first, edges second
The size you order is the picture on the front of the finished canvas. A file prepared with its own wrap is larger because extra artwork continues around the sides and towards the back.
| What you are preparing | Document size | At 300 PPI | At 150 PPI |
|---|---|---|---|
| Front artwork only | 20″ × 16″ | 6,000 × 4,800 px | 3,000 × 2,400 px |
| Slim: 1″ extra on every edge | 22″ × 18″ | 6,600 × 5,400 px | 3,300 × 2,700 px |
| Chunky: 2″ extra on every edge | 24″ × 20″ | 7,200 × 6,000 px | 3,600 × 3,000 px |
The larger documents still produce a 20″ × 16″ front. Do not order a 22″ × 18″ canvas because your prepared Slim artwork has those outer dimensions.
First decide what you are sending us
MOST PHOTOGRAPHS
Send the original
Use your original photo in the Canvas Creator. Choose the finished size, crop, depth and sides. You do not need to add the 1″ or 2″ artwork allowance yourself for this route.
Keep the highest-quality copy. If a person, signature or detail must stay on the front, leave a note so we know what matters.
IF YOU WANT TO PREPARE IT
Send a complete wrap file
Prepare the front at the intended size, add the correct allowance all around, and fill that extra area. Then tell us the front size, frame depth and allowance used.
Use the Email option in the creator and send the prepared artwork separately with the order details. Contact us before ordering if the intended front cannot be shown correctly.
A file containing its own wrap needs to be identified clearly. If the whole expanded file is treated as the front photograph, your picture can be reduced or cropped again and another set of sides can be generated. Do not assume the creator recognises a prepared wrap automatically.
For normal photo orders, start with the Canvas Creator. For a prepared file or a crop that needs explaining, contact the workshop.
Find the best original before changing anything
Start with the photograph from the camera or phone, or the full-resolution download supplied by your photographer. A picture saved from social media, a screenshot or a copy passed through a messaging app may have fewer pixels or stronger compression.
Look for the image’s pixel dimensions, such as 4,032 × 3,024. Many photo apps show this under information or details. Desktop image editors usually show it in their image-size window. If your app reports megapixels, that is the total pixel count rather than the width and height you need for these calculations.
Save a working copy before you crop. Keep the original separately. If you later choose a different shape, it is much easier to return to the untouched file than to work from a picture that has already lost its edges.
File size in megabytes is a poor quality test. A large file can contain blur, compression damage or enlarged pixels. A smaller, well-saved original may contain better detail. Look at the picture as well as its numbers: eyes, hair, fur, lettering and fine edges are useful places to check.
Choose the shape before you calculate the pixels
A photograph and a canvas can have different proportions. Making a picture physically larger does not make it fit a different shape. You need to crop it, use a suitable border or background, or choose a canvas size closer to the original proportions.
| Front size | Aspect ratio | What it means |
|---|---|---|
| 12″ × 8″ or 24″ × 16″ | 3:2 | Width is one and a half times the height. |
| 16″ × 12″ | 4:3 | A different crop from 3:2. |
| 20″ × 16″ | 5:4 | A slightly squarer rectangle. |
| 16″ × 16″ | 1:1 | A square. |
For example, a 6,000 × 4,000 photograph is 3:2. To fill a 20″ × 16″ front without distortion, a centred 5:4 crop uses 5,000 × 4,000 pixels. That removes 500 pixels from each side. You can move the crop to favour one side, but the total retained width is still 5,000 pixels.
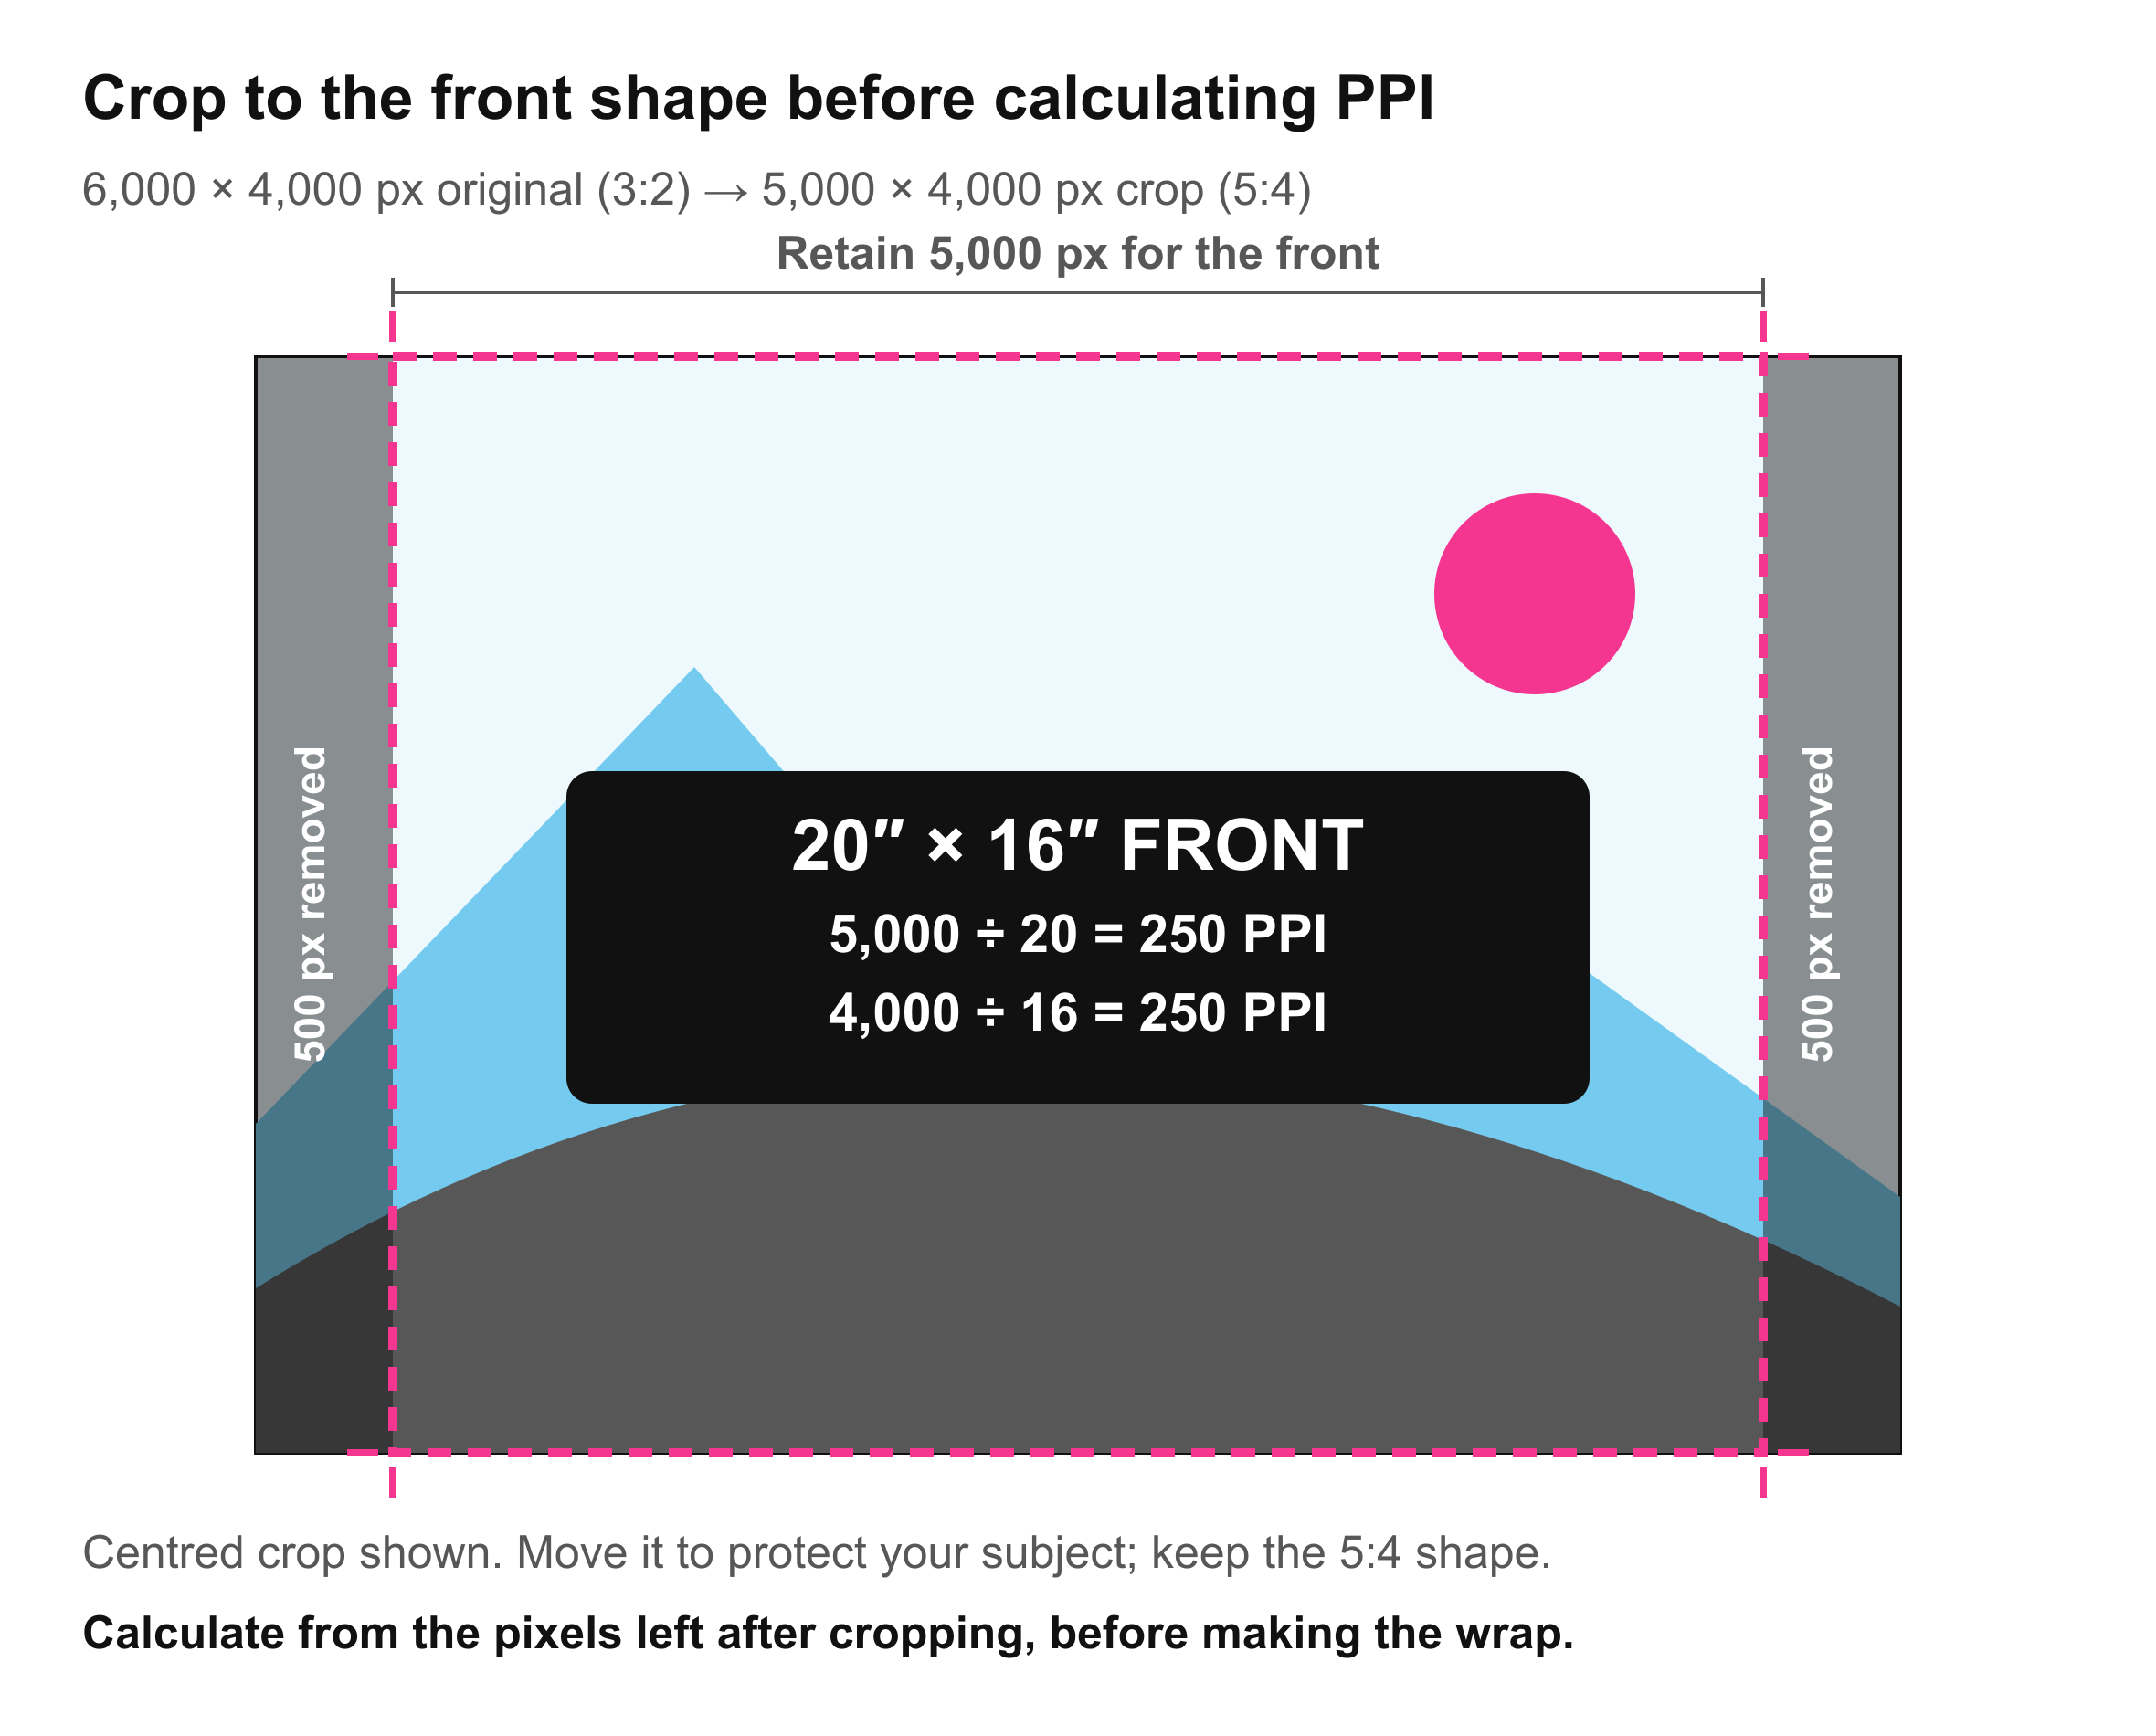
Calculate the print resolution from those remaining pixels, not from the untouched 6,000-pixel width. In this example, 5,000 ÷ 20 and 4,000 ÷ 16 both give 250 PPI.
Do not unlock the image proportions and force it into a new width and height. That makes faces wider, circles oval and familiar shapes look slightly wrong. If the full photograph matters more than a standard size, compare a custom canvas size before committing to a crop.
THE NUMBER EVERYONE ASKS ABOUT
300 DPI or 150 DPI: what changes?
People normally call this DPI, so you will see that term in print conversations. For the image file, the precise term is PPI: pixels per inch. DPI describes the dots a printer produces. A printer’s advertised DPI is a different measurement from the number of image pixels you supply.
In this guide, “300 DPI artwork” means a file prepared at 300 PPI at its final printed size. The relationship is straightforward:
Apply it to each dimension. A 20″ × 16″ front at 300 PPI needs 20 × 300 = 6,000 pixels across and 16 × 300 = 4,800 pixels down. At 150 PPI, the same front needs 3,000 × 2,400 pixels.
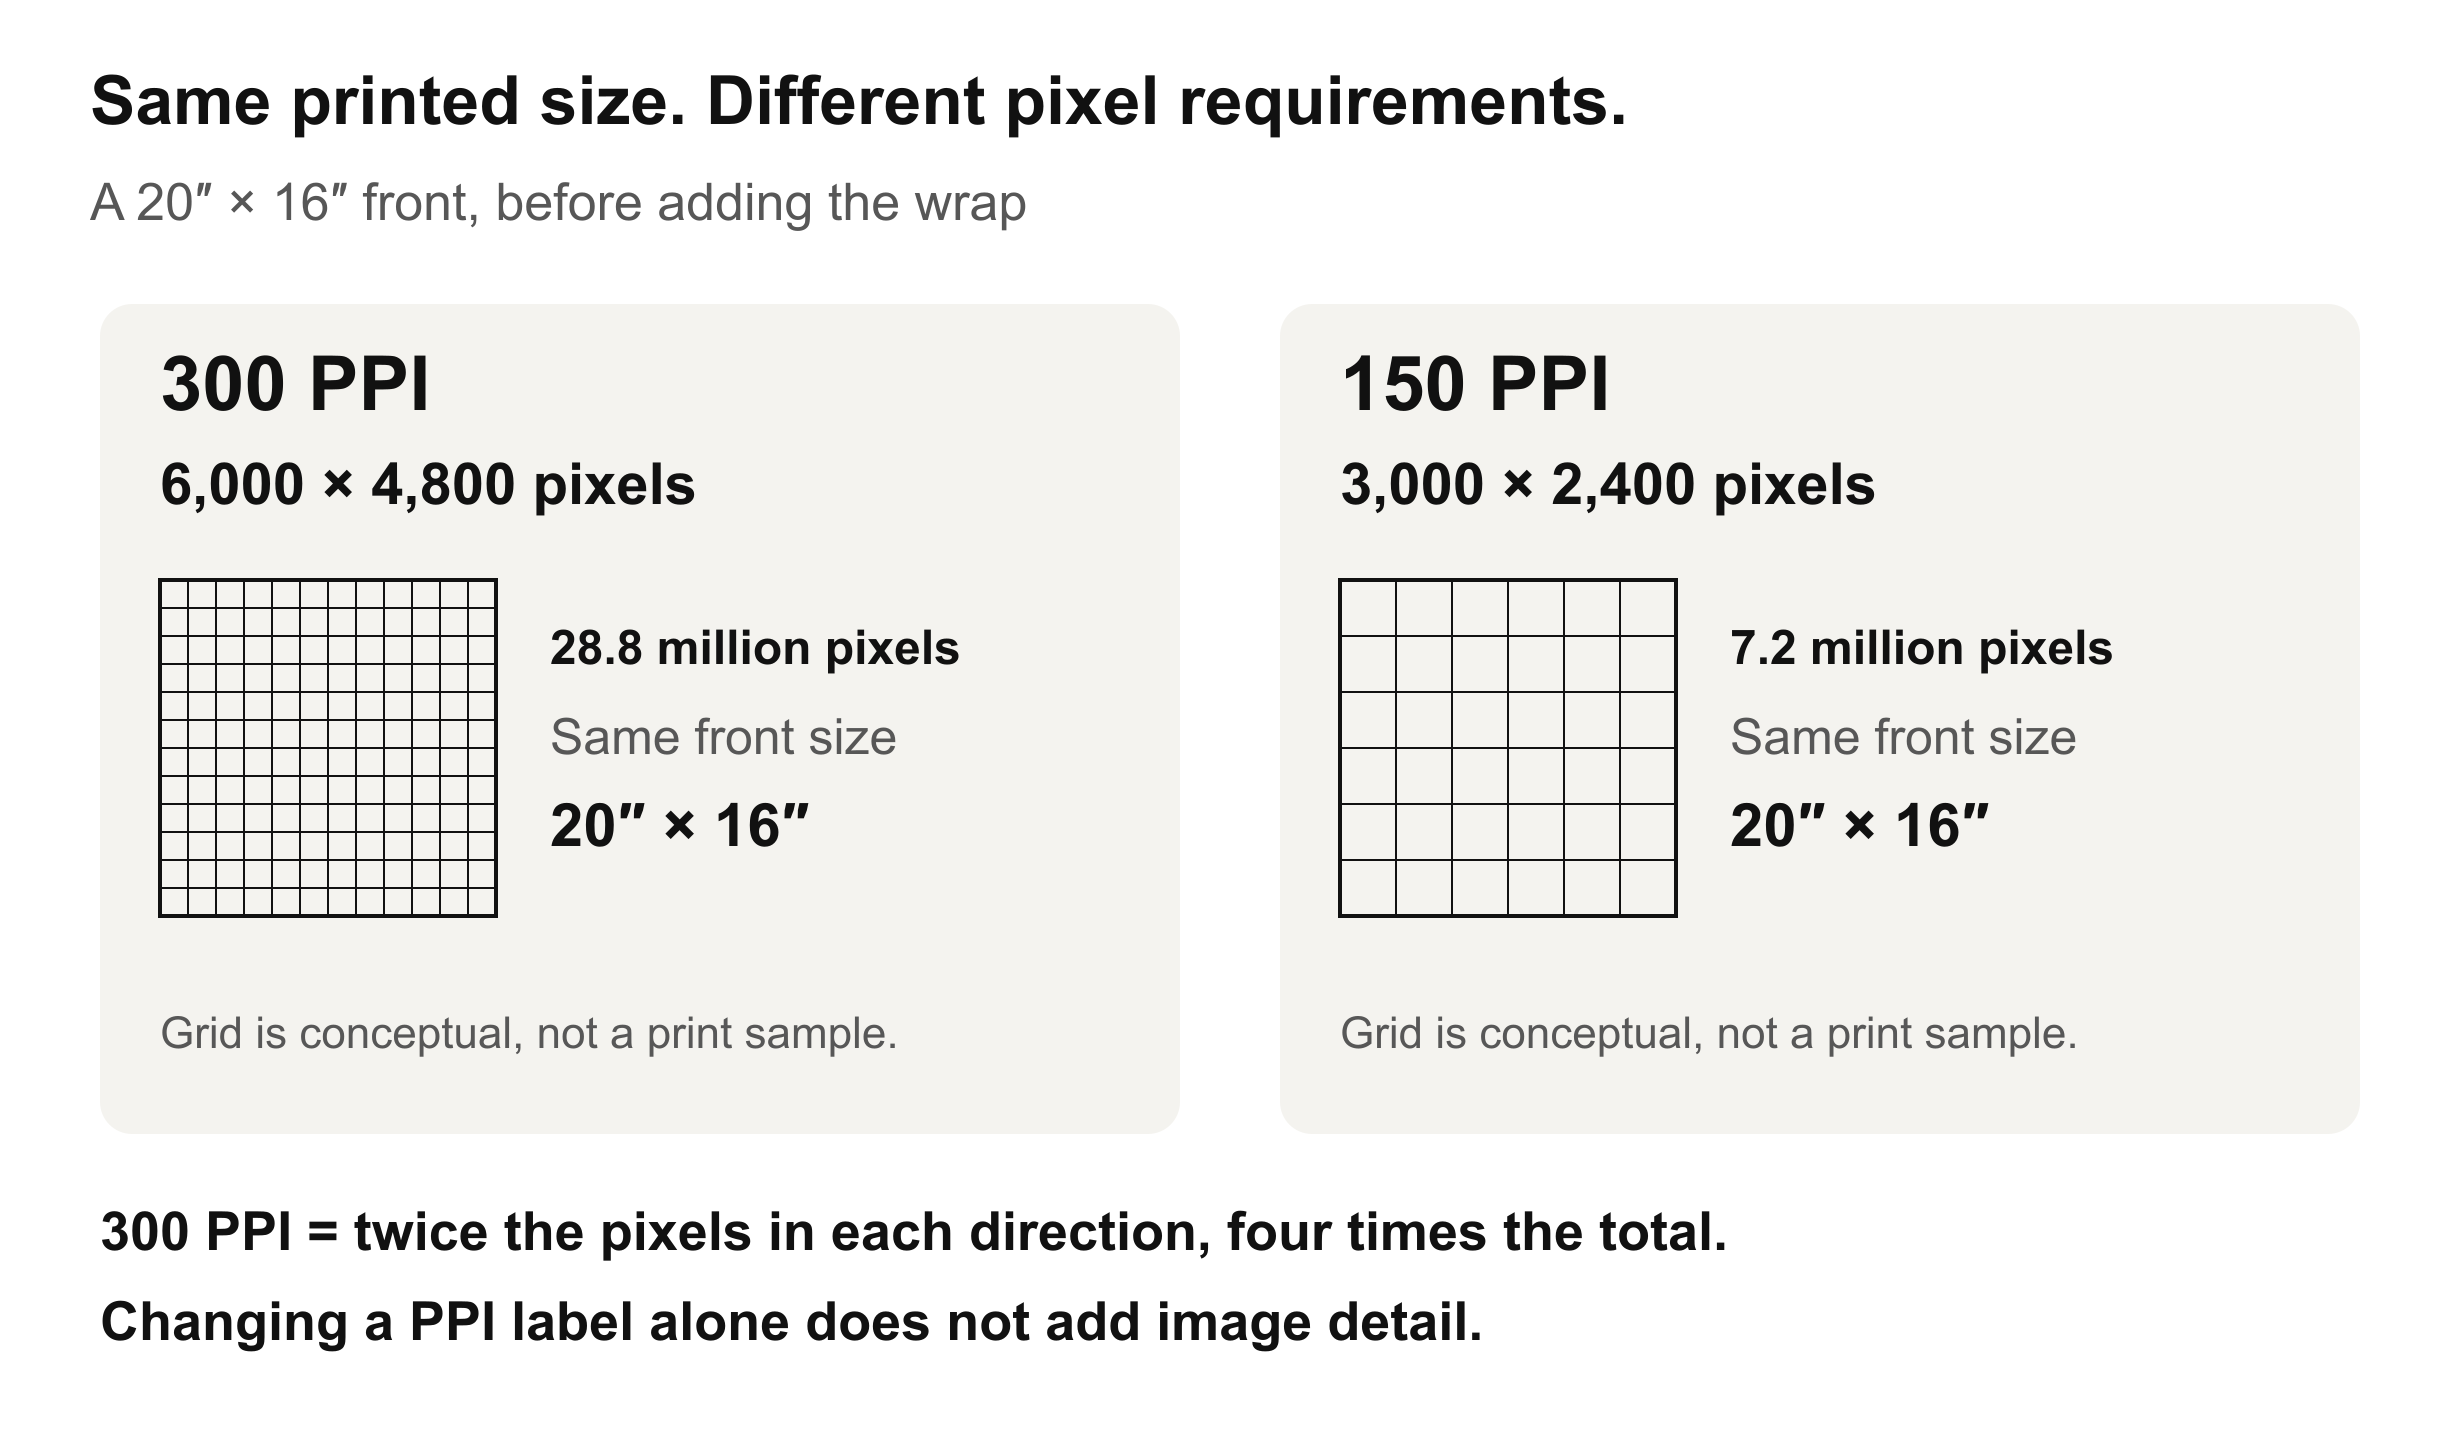
300 PPI is a useful target when your original supports it, particularly for close viewing, detailed photographs and artwork containing text. 150 PPI can be a practical canvas preparation choice where the original, subject, size and viewing distance suit it. It is not an automatic quality pass. Fine lettering, intricate patterns and a soft photograph can remain disappointing at either setting.
At the same physical size, 300 PPI has twice as many pixels across and down as 150 PPI: four times as many pixels overall. For the front in our example, that is 28.8 million pixels against 7.2 million. This does not mean the saved JPEG will be exactly four times larger; compression and image content affect the file size.
You do not need to discard a good photograph because it works out at 220 or 250 PPI. Those are valid densities too. Nor should you automatically reduce a detailed original to 150 PPI just because that figure appears in a table. Keep the best source and let the actual picture guide the decision.
Technical reference: Adobe’s explanation of pixels, physical size and resolution. The 150 PPI discussion here is practical canvas guidance, rather than a universal print-quality threshold.
A “72 DPI” label does not automatically mean a poor photograph
A 4,000 × 3,000 image tagged 72 PPI still contains 4,000 × 3,000 pixels. If you change only its resolution label to 300 PPI, those pixels remain the same. Without adding pixels, it corresponds to roughly 13.33″ × 10″ at 300 PPI, or 26.67″ × 20″ at 150 PPI, before any crop or wrap.
Changing the label does not reveal new eyelashes or restore a blurred face. Conversely, a photograph does not lose its existing detail because a camera saved it with a 72 PPI label. The useful questions are how many pixels remain after cropping and how sharply those pixels describe the subject.
Resizing and upscaling are different decisions
Resampling changes the pixel count. Software can add pixels when enlarging or remove them when reducing. An enlarged file can look smoother, but extra pixels should not be mistaken for captured detail. If you try an enlargement, compare it carefully with the original, especially around faces, fur, repeated patterns and text.
For an irreplaceable image, send us the original as well as your prepared version. It gives us a better starting point if the edited file has become over-sharpened or the crop needs another look. You do not need to enlarge it first just to make an upload look more impressive.
WHY THE DOCUMENT IS BIGGER THAN THE CANVAS
The 1″ and 2″ artwork allowances explained
Our canvas is stretched over a timber frame. The picture has a front face, visible sides and an allowance towards the rear. A finished-front measurement describes only the front face.
| Canvas profile | Frame depth | Extra artwork per edge | Breakdown per edge |
|---|---|---|---|
| Slim | 0.75″ / 19.05 mm | 1″ / 25.4 mm | 0.75″ side + 0.25″ rear allowance |
| Chunky | 1.75″ / 44.45 mm | 2″ / 50.8 mm | 1.75″ side + 0.25″ rear allowance |
The 0.25″ rear allowance is already included in the 1″ or 2″ total. Do not add it again. These are our illustrated preparation dimensions, not a template for every canvas printer or a specification for posters and framed paper prints.
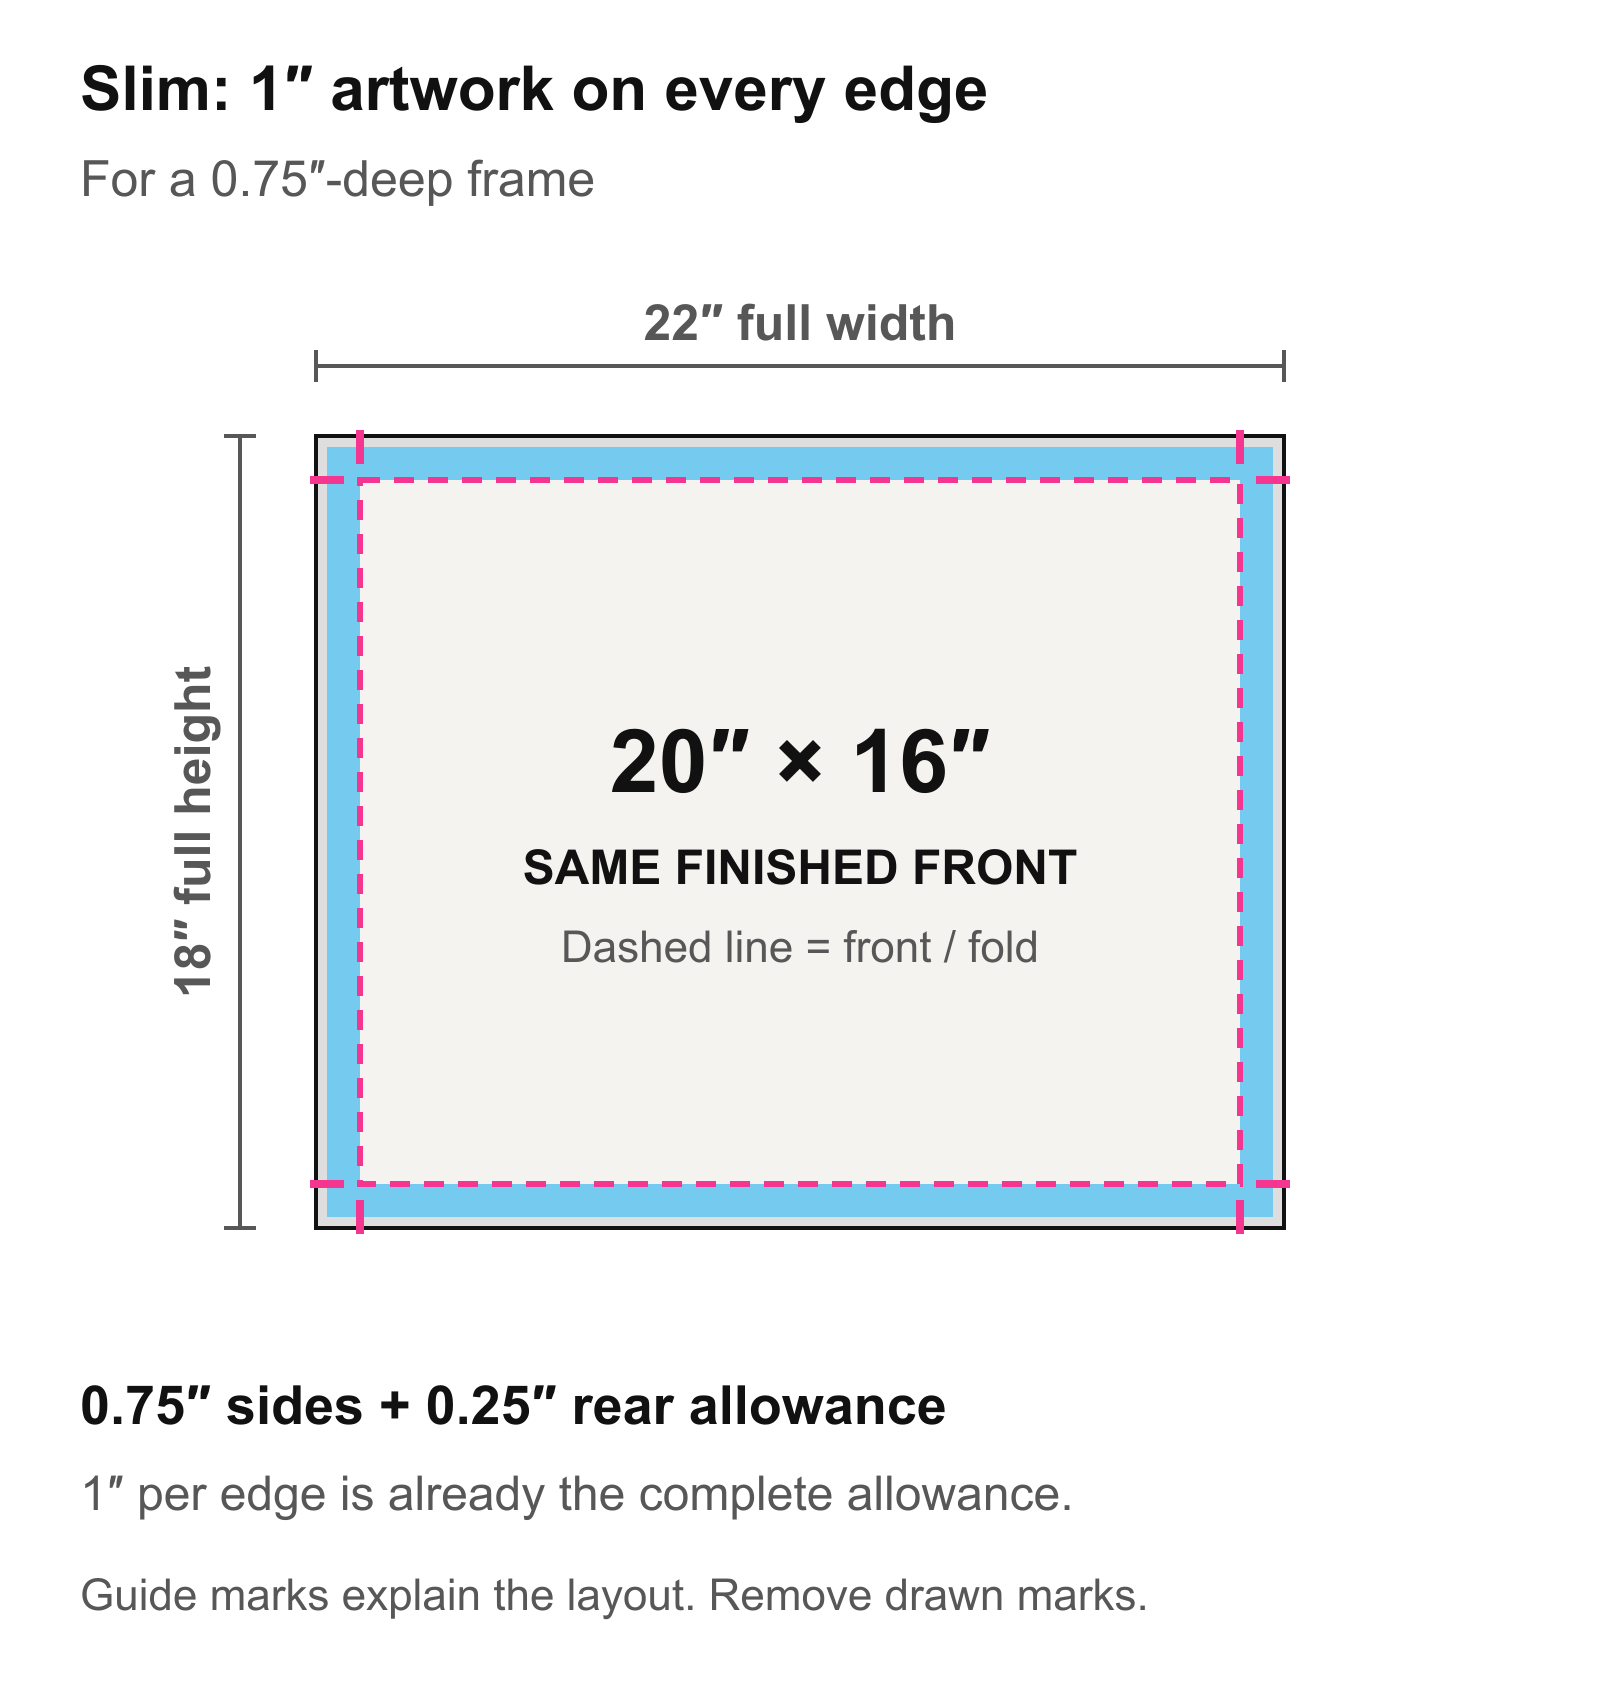
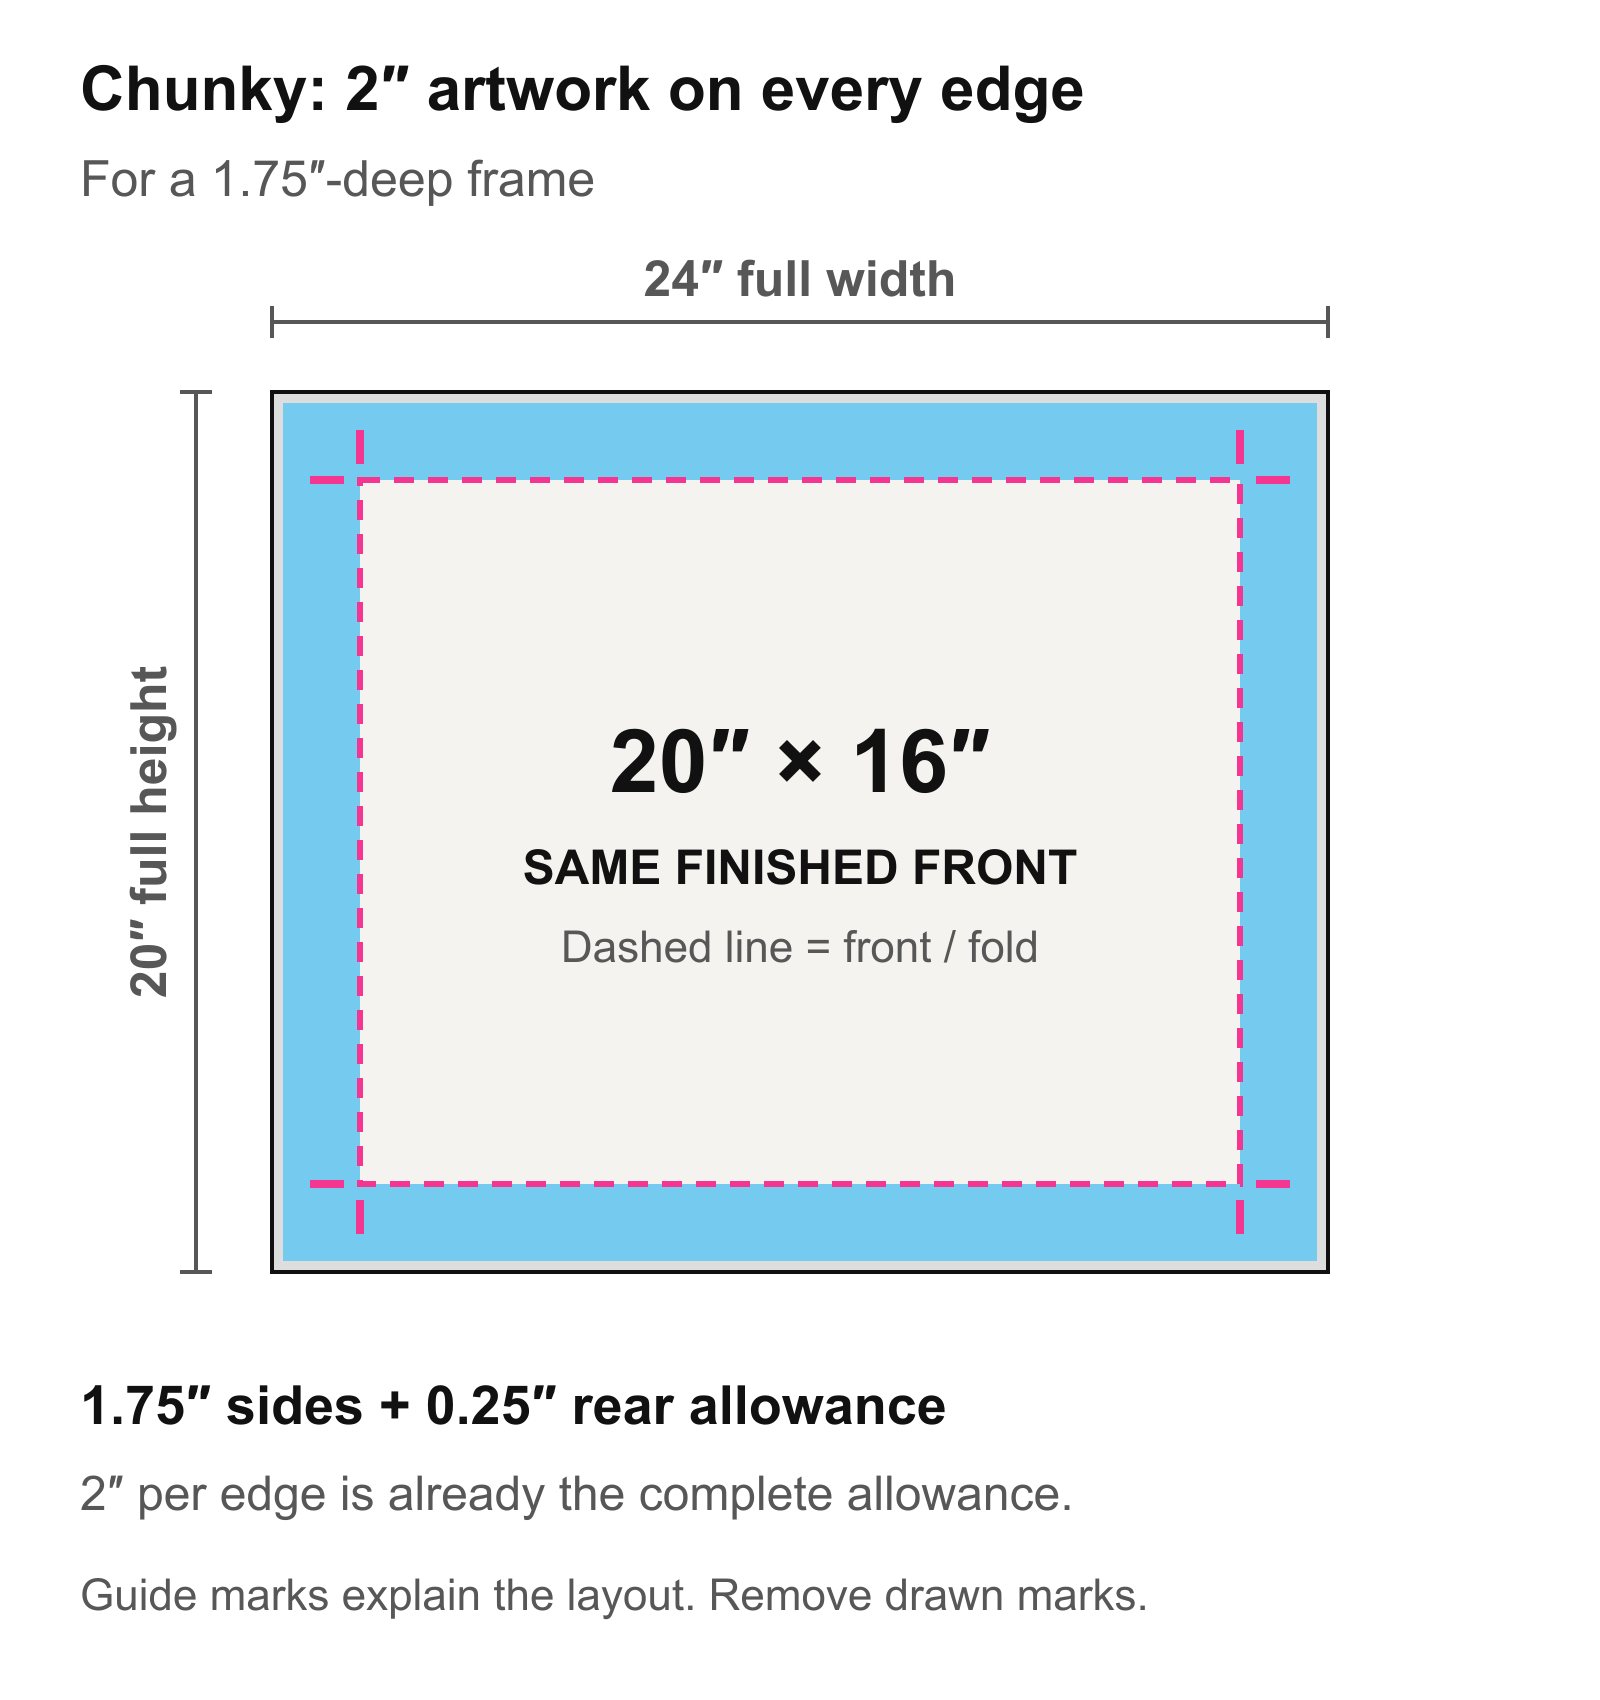
For 1″ on every edge, add 2″ to each dimension
There is 1″ on the left and 1″ on the right, so the width increases by 2″. The top and bottom add another 2″ to the height. A 20″ × 16″ front therefore needs a 22″ × 18″ document.
For 2″ on every edge, add 4″ to each dimension
The left and right each need 2″; the top and bottom do too. The same 20″ × 16″ front needs a 24″ × 20″ document. The deeper frame needs more artwork around the perimeter, while the intended picture on the front stays the same size.
Full height = front height + (2 × edge allowance)
Once you have the full document size in inches, multiply each dimension by 300 or 150 to get the document’s pixel dimensions. An allowance of 1″ is 300 pixels at 300 PPI or 150 pixels at 150 PPI. An allowance of 2″ is 600 pixels at 300 PPI or 300 pixels at 150 PPI.
What about crop marks?
The dashed lines and corner marks in these illustrations identify the intended front boundary and fold position. They help you see what will be on the front and what continues around the sides. The canvas is not cut down to that inner rectangle.
Keep these as non-printing editor guides. If you draw coloured lines, corner ticks or measurements onto an artwork layer, they become part of the picture unless you remove that layer before exporting. Supply a separate annotated reference if you want to show us the intended front.
WORK OUT YOUR OWN SIZE
Canvas artwork size calculator
Enter the finished front dimensions, then choose whether you are preparing front artwork or a complete wrap. The results show the document size, pixels and front-guide positions at your chosen resolution.
Optional: check the pixels in your original photograph
Use the original photo dimensions before adding any wrap, in its intended orientation. This estimates the largest proportional front crop and its PPI, without enlarging it. It does not assess picture quality.
For centimetres, divide by 2.54 to get inches. For millimetres, divide by 25.4. Then apply the same pixel calculation. Round only at the end: a fractional pixel has to become a whole pixel in the exported file.
For example, a 50 × 40 cm front with 1″ on every edge needs a 55.08 × 45.08 cm document. At 300 PPI, that is approximately 6,506 × 5,324 pixels. The allowance remains 25.4 mm on each edge; it does not become 1 cm because your document uses centimetres.
The calculator handles sizing arithmetic. It does not assess sharpness, approve artwork, price an order or confirm that a custom size is available. Check order dimensions and available finishes in the creator.
Exactly where to put the front guides
Use the top-left corner of the full document as zero. Put the first vertical guide one allowance in from the left. Put the second at allowance + front width. Do the same horizontally using the height.
These coordinates mark the boundaries between pixels, as editor rulers do. A guide at x = 300 sits 300 pixels from the left edge; it is not a request to draw a line through a row of pixels.
| Setup | Full file, pixels | Vertical guides, x | Horizontal guides, y |
|---|---|---|---|
| 1″ edges · 300 PPI | 6,600 × 5,400 | 300 and 6,300 | 300 and 5,100 |
| 1″ edges · 150 PPI | 3,300 × 2,700 | 150 and 3,150 | 150 and 2,550 |
| 2″ edges · 300 PPI | 7,200 × 6,000 | 600 and 6,600 | 600 and 5,400 |
| 2″ edges · 150 PPI | 3,600 × 3,000 | 300 and 3,300 | 300 and 2,700 |
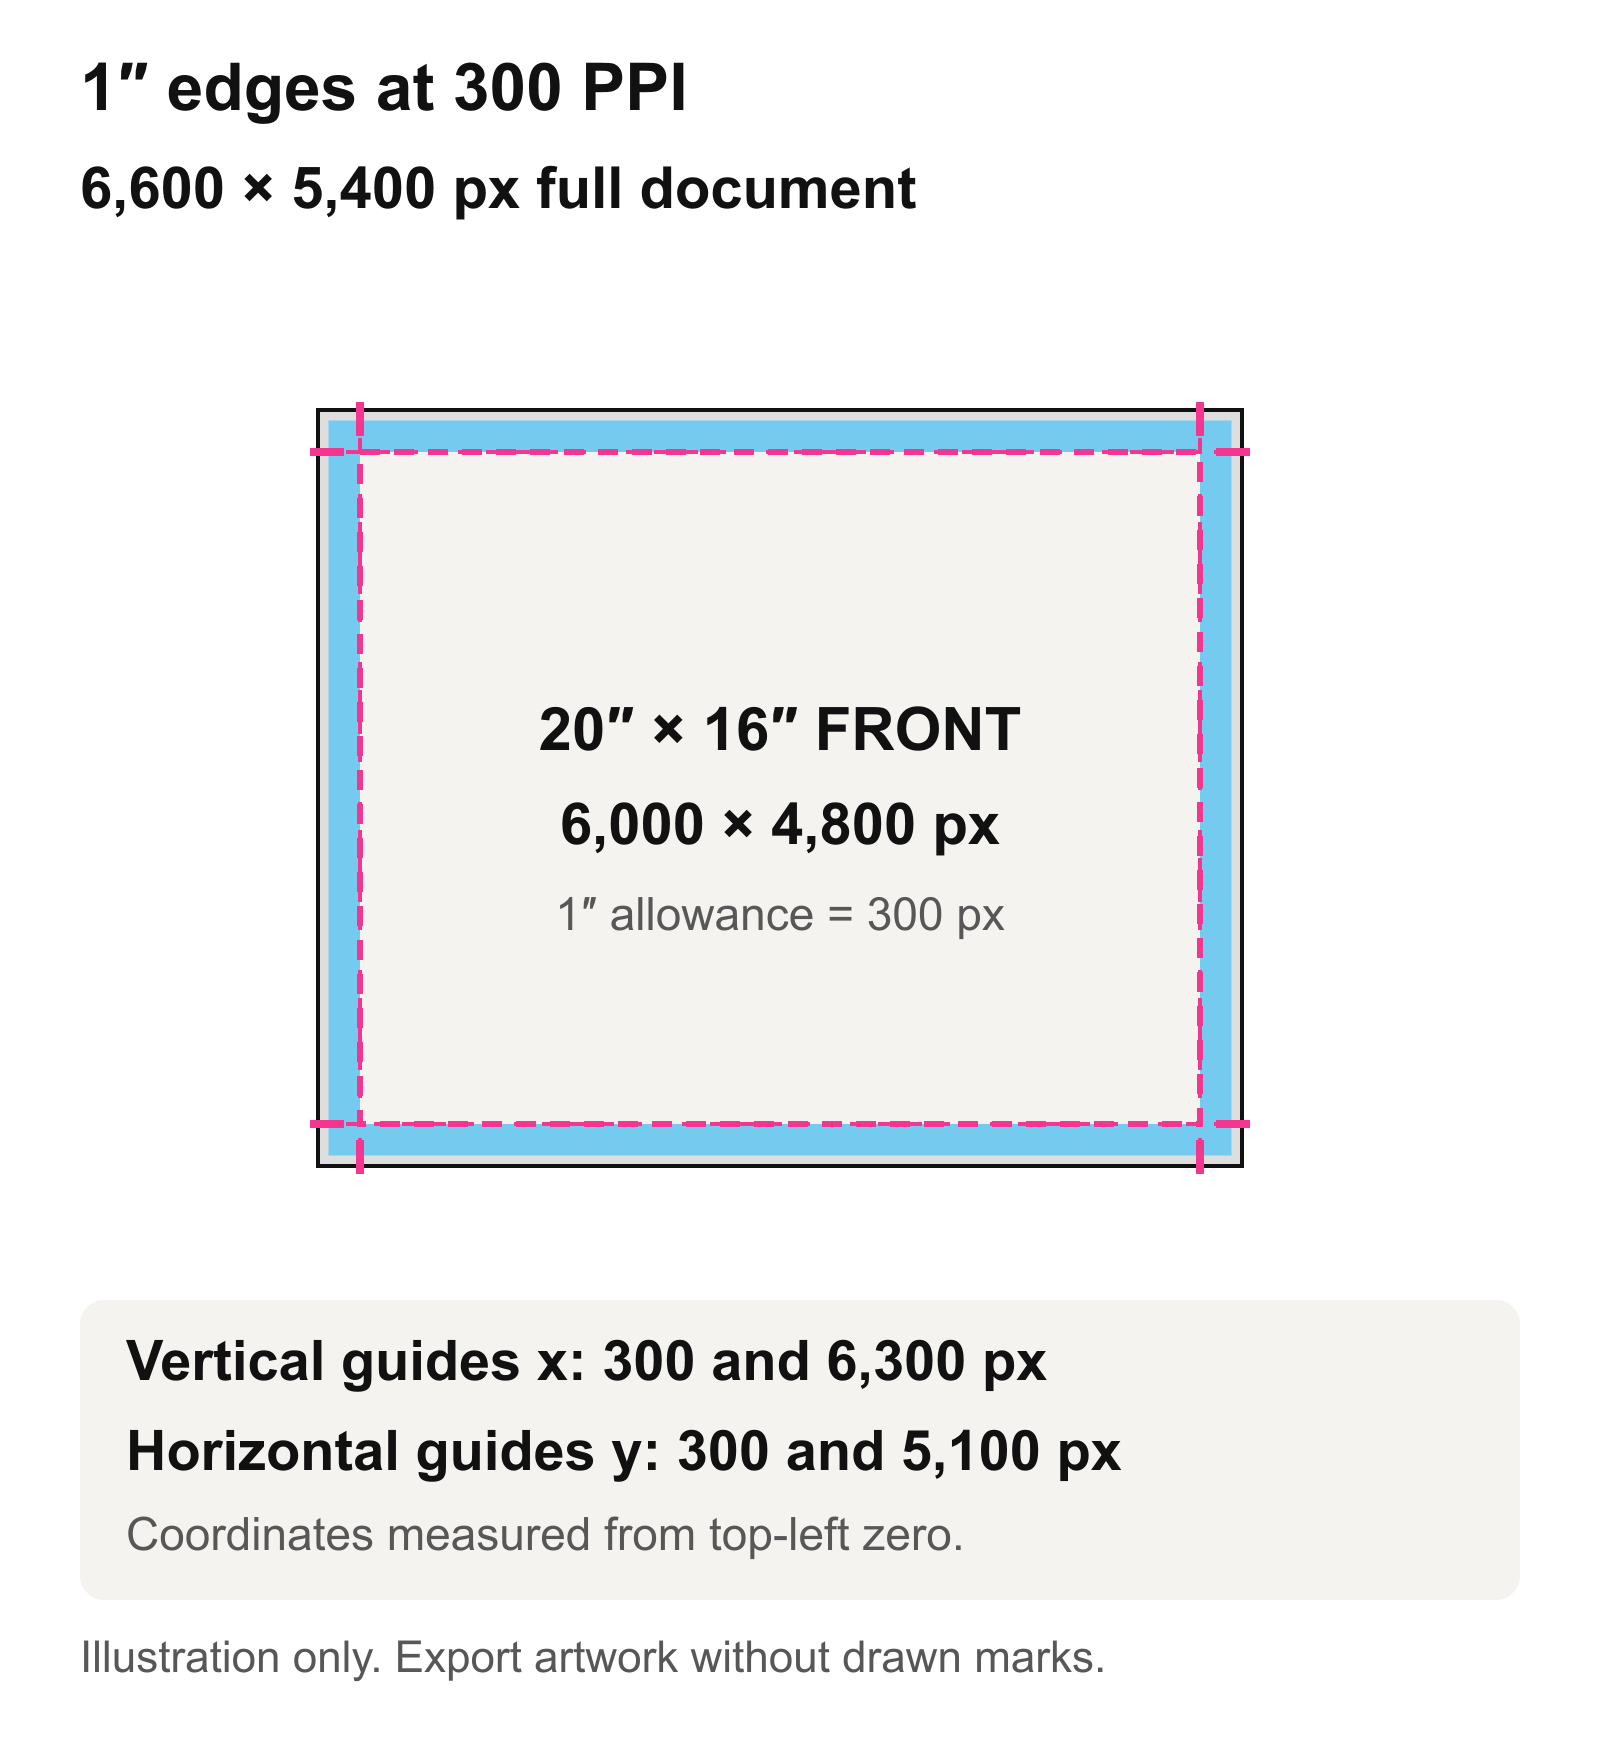
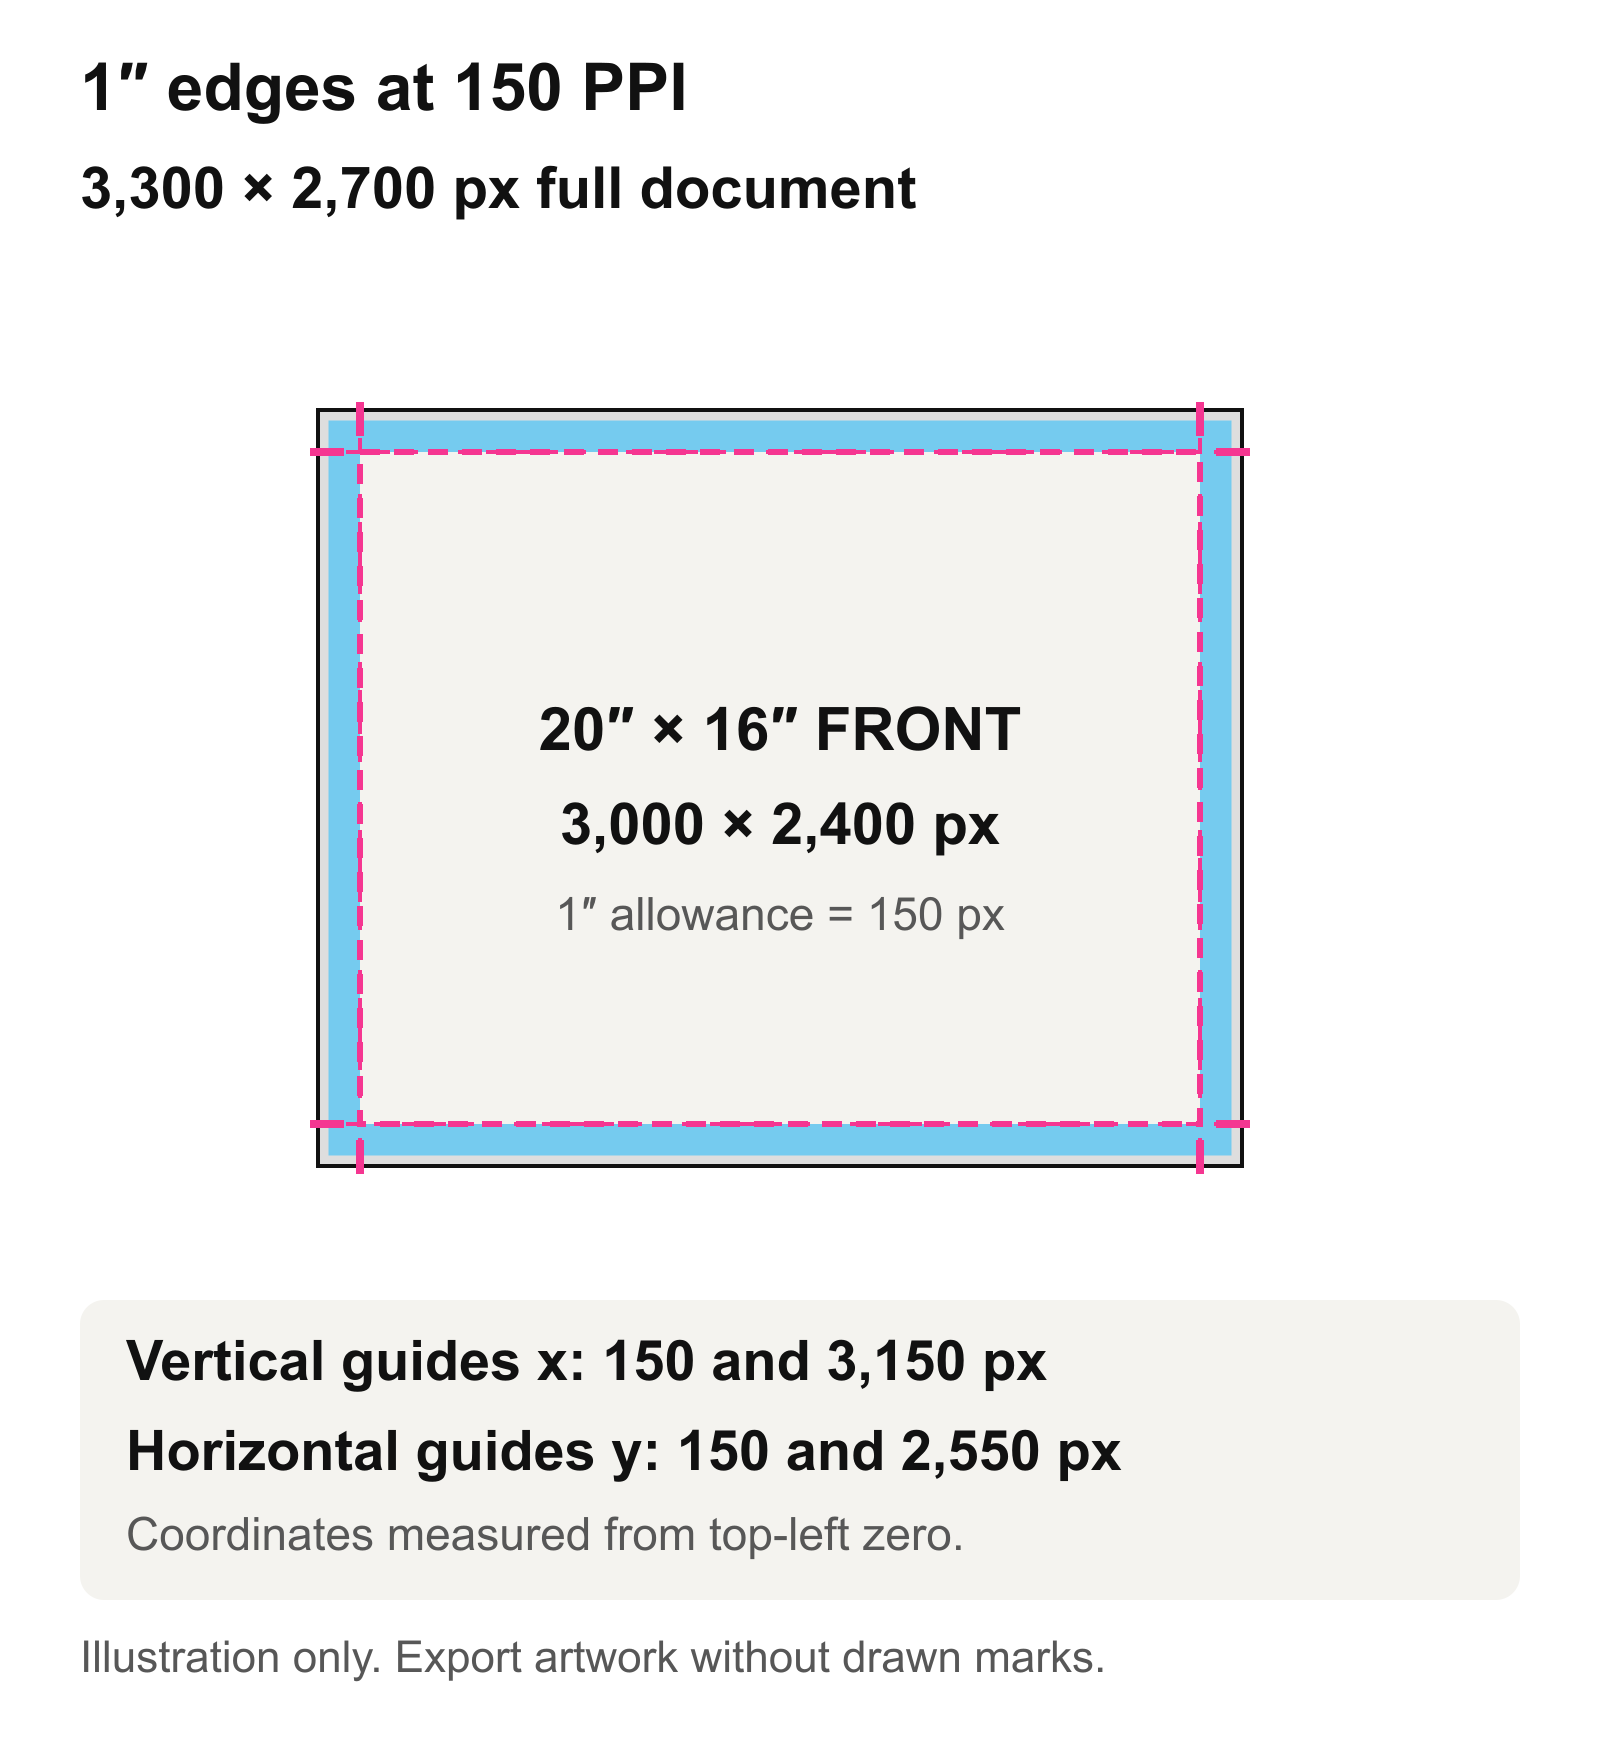
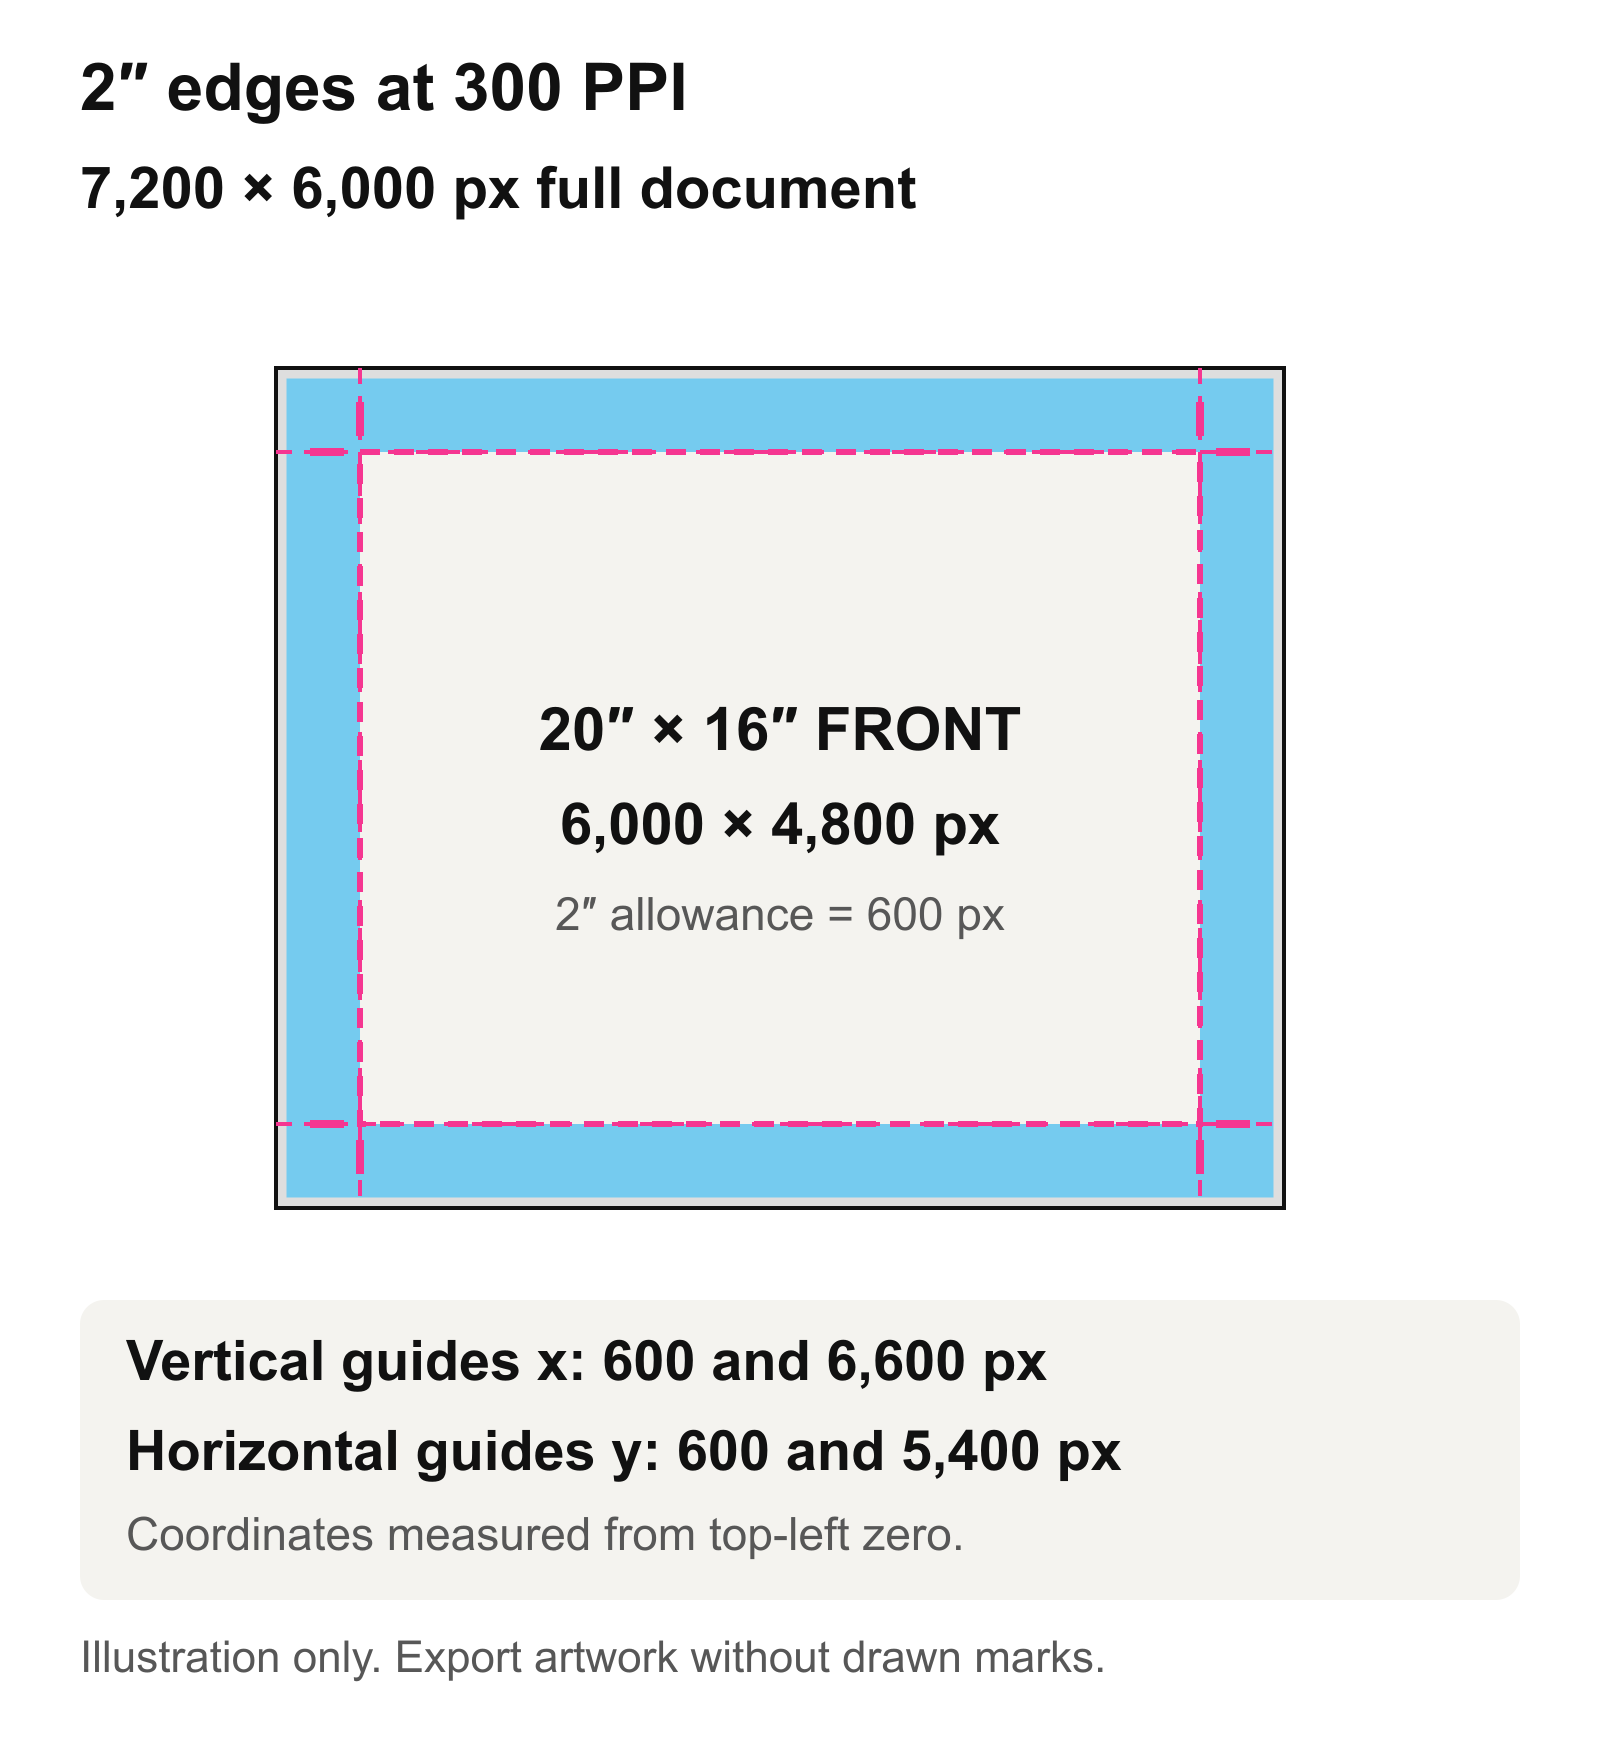
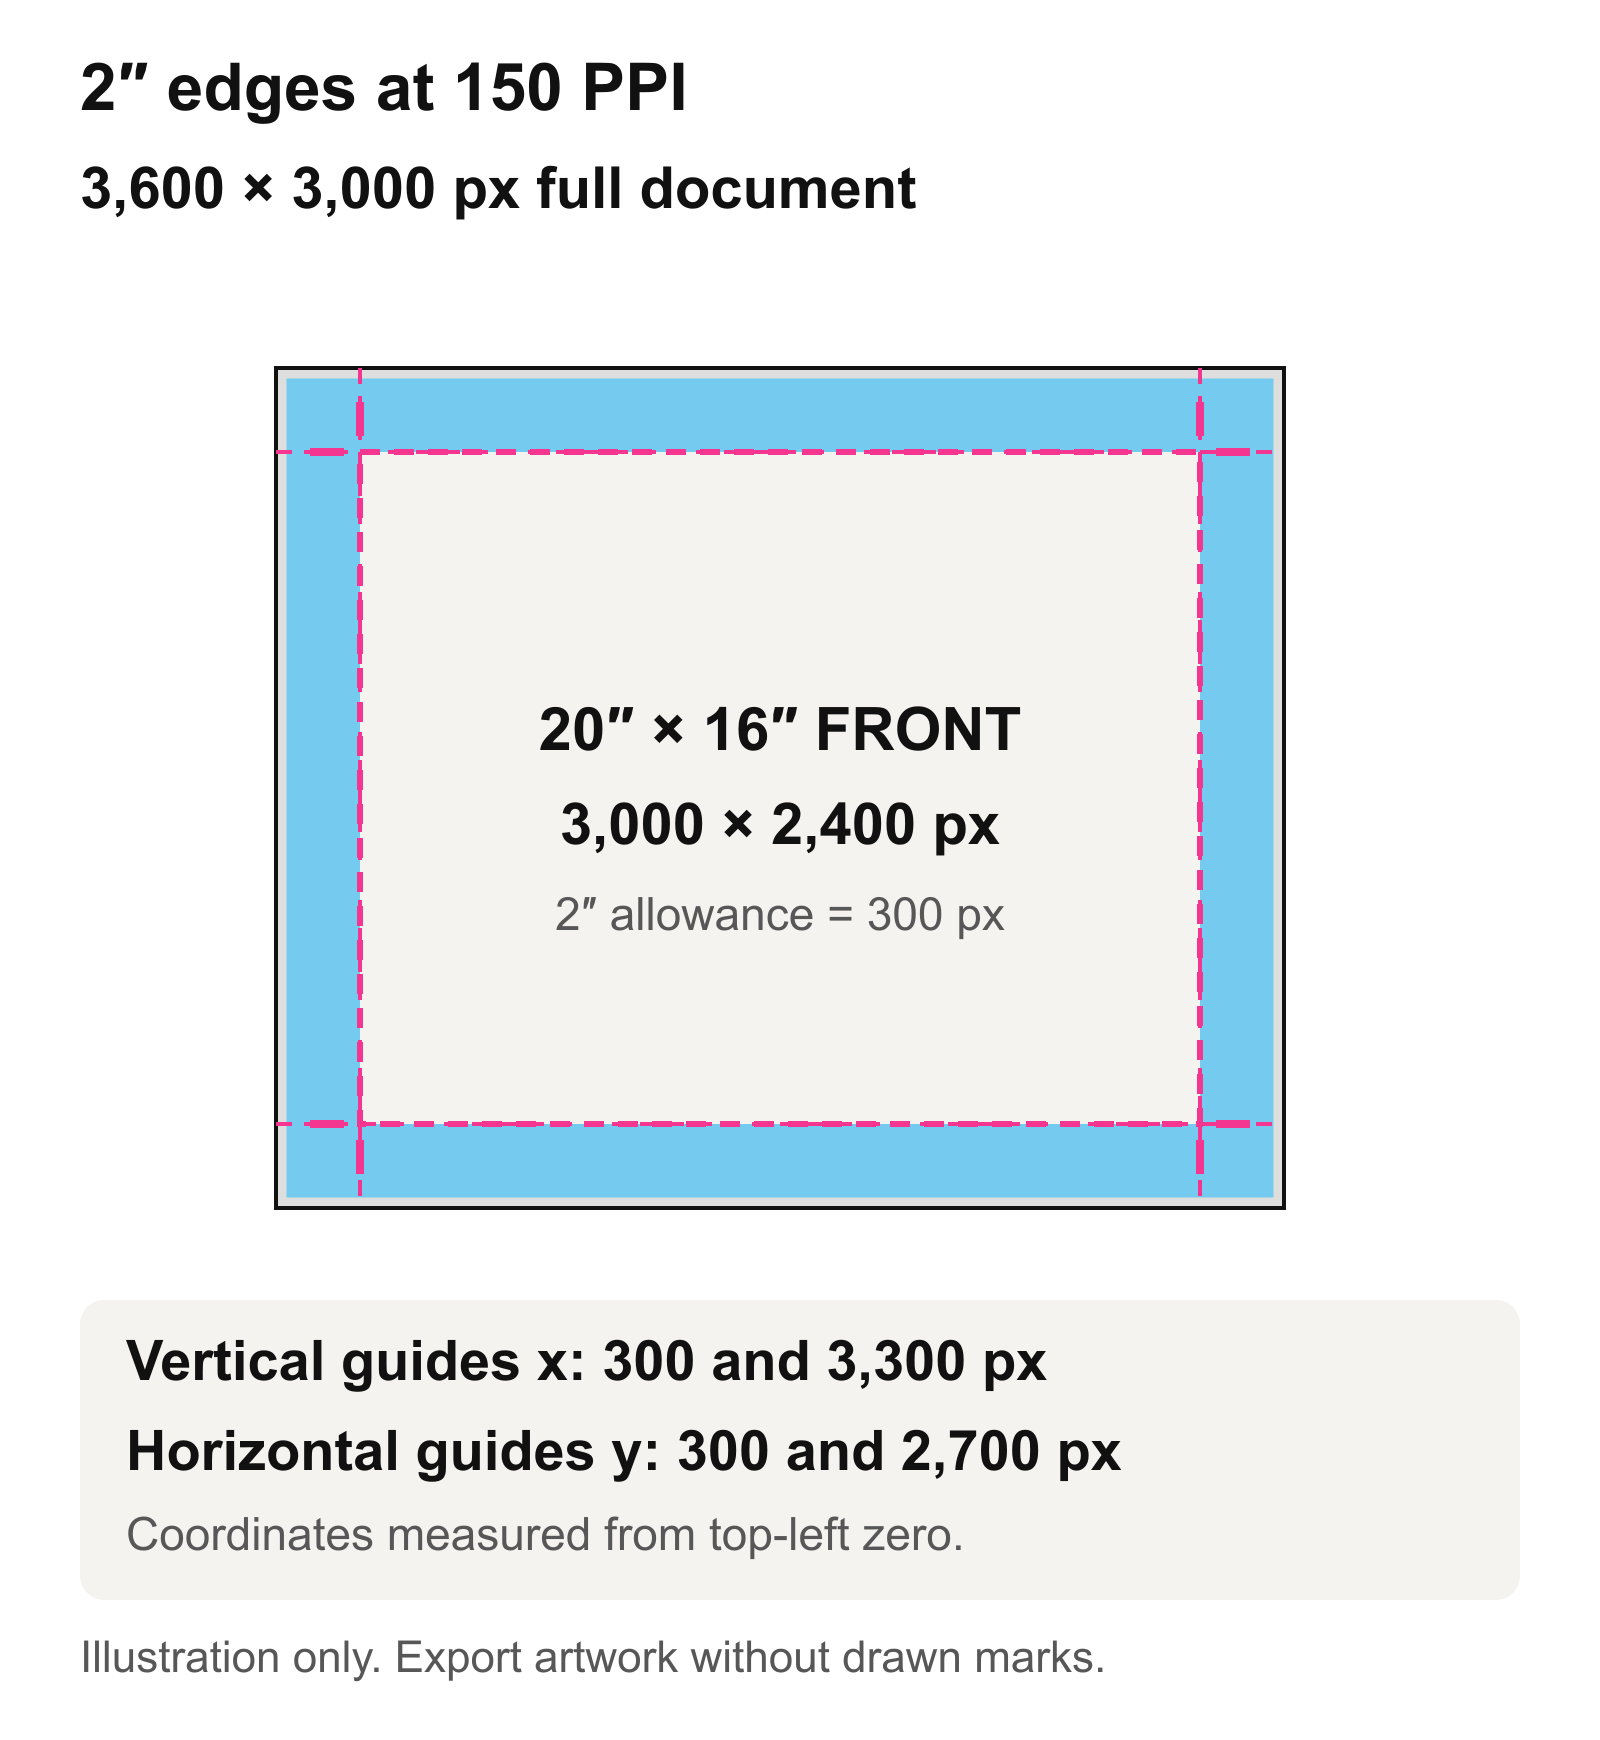
If your editor uses inches, the 1″ setup has vertical guides at 1″ and 21″, and horizontal guides at 1″ and 17″. For the 2″ setup, use 2″ and 22″ vertically, and 2″ and 18″ horizontally.
For portrait artwork, swap the width and height. A 16″ wide × 20″ high front with 1″ edges becomes 18″ × 22″. At 300 PPI that is 5,400 × 6,600 pixels, with x guides at 300 and 5,100 and y guides at 300 and 6,300.
Keep important details comfortably inside the front
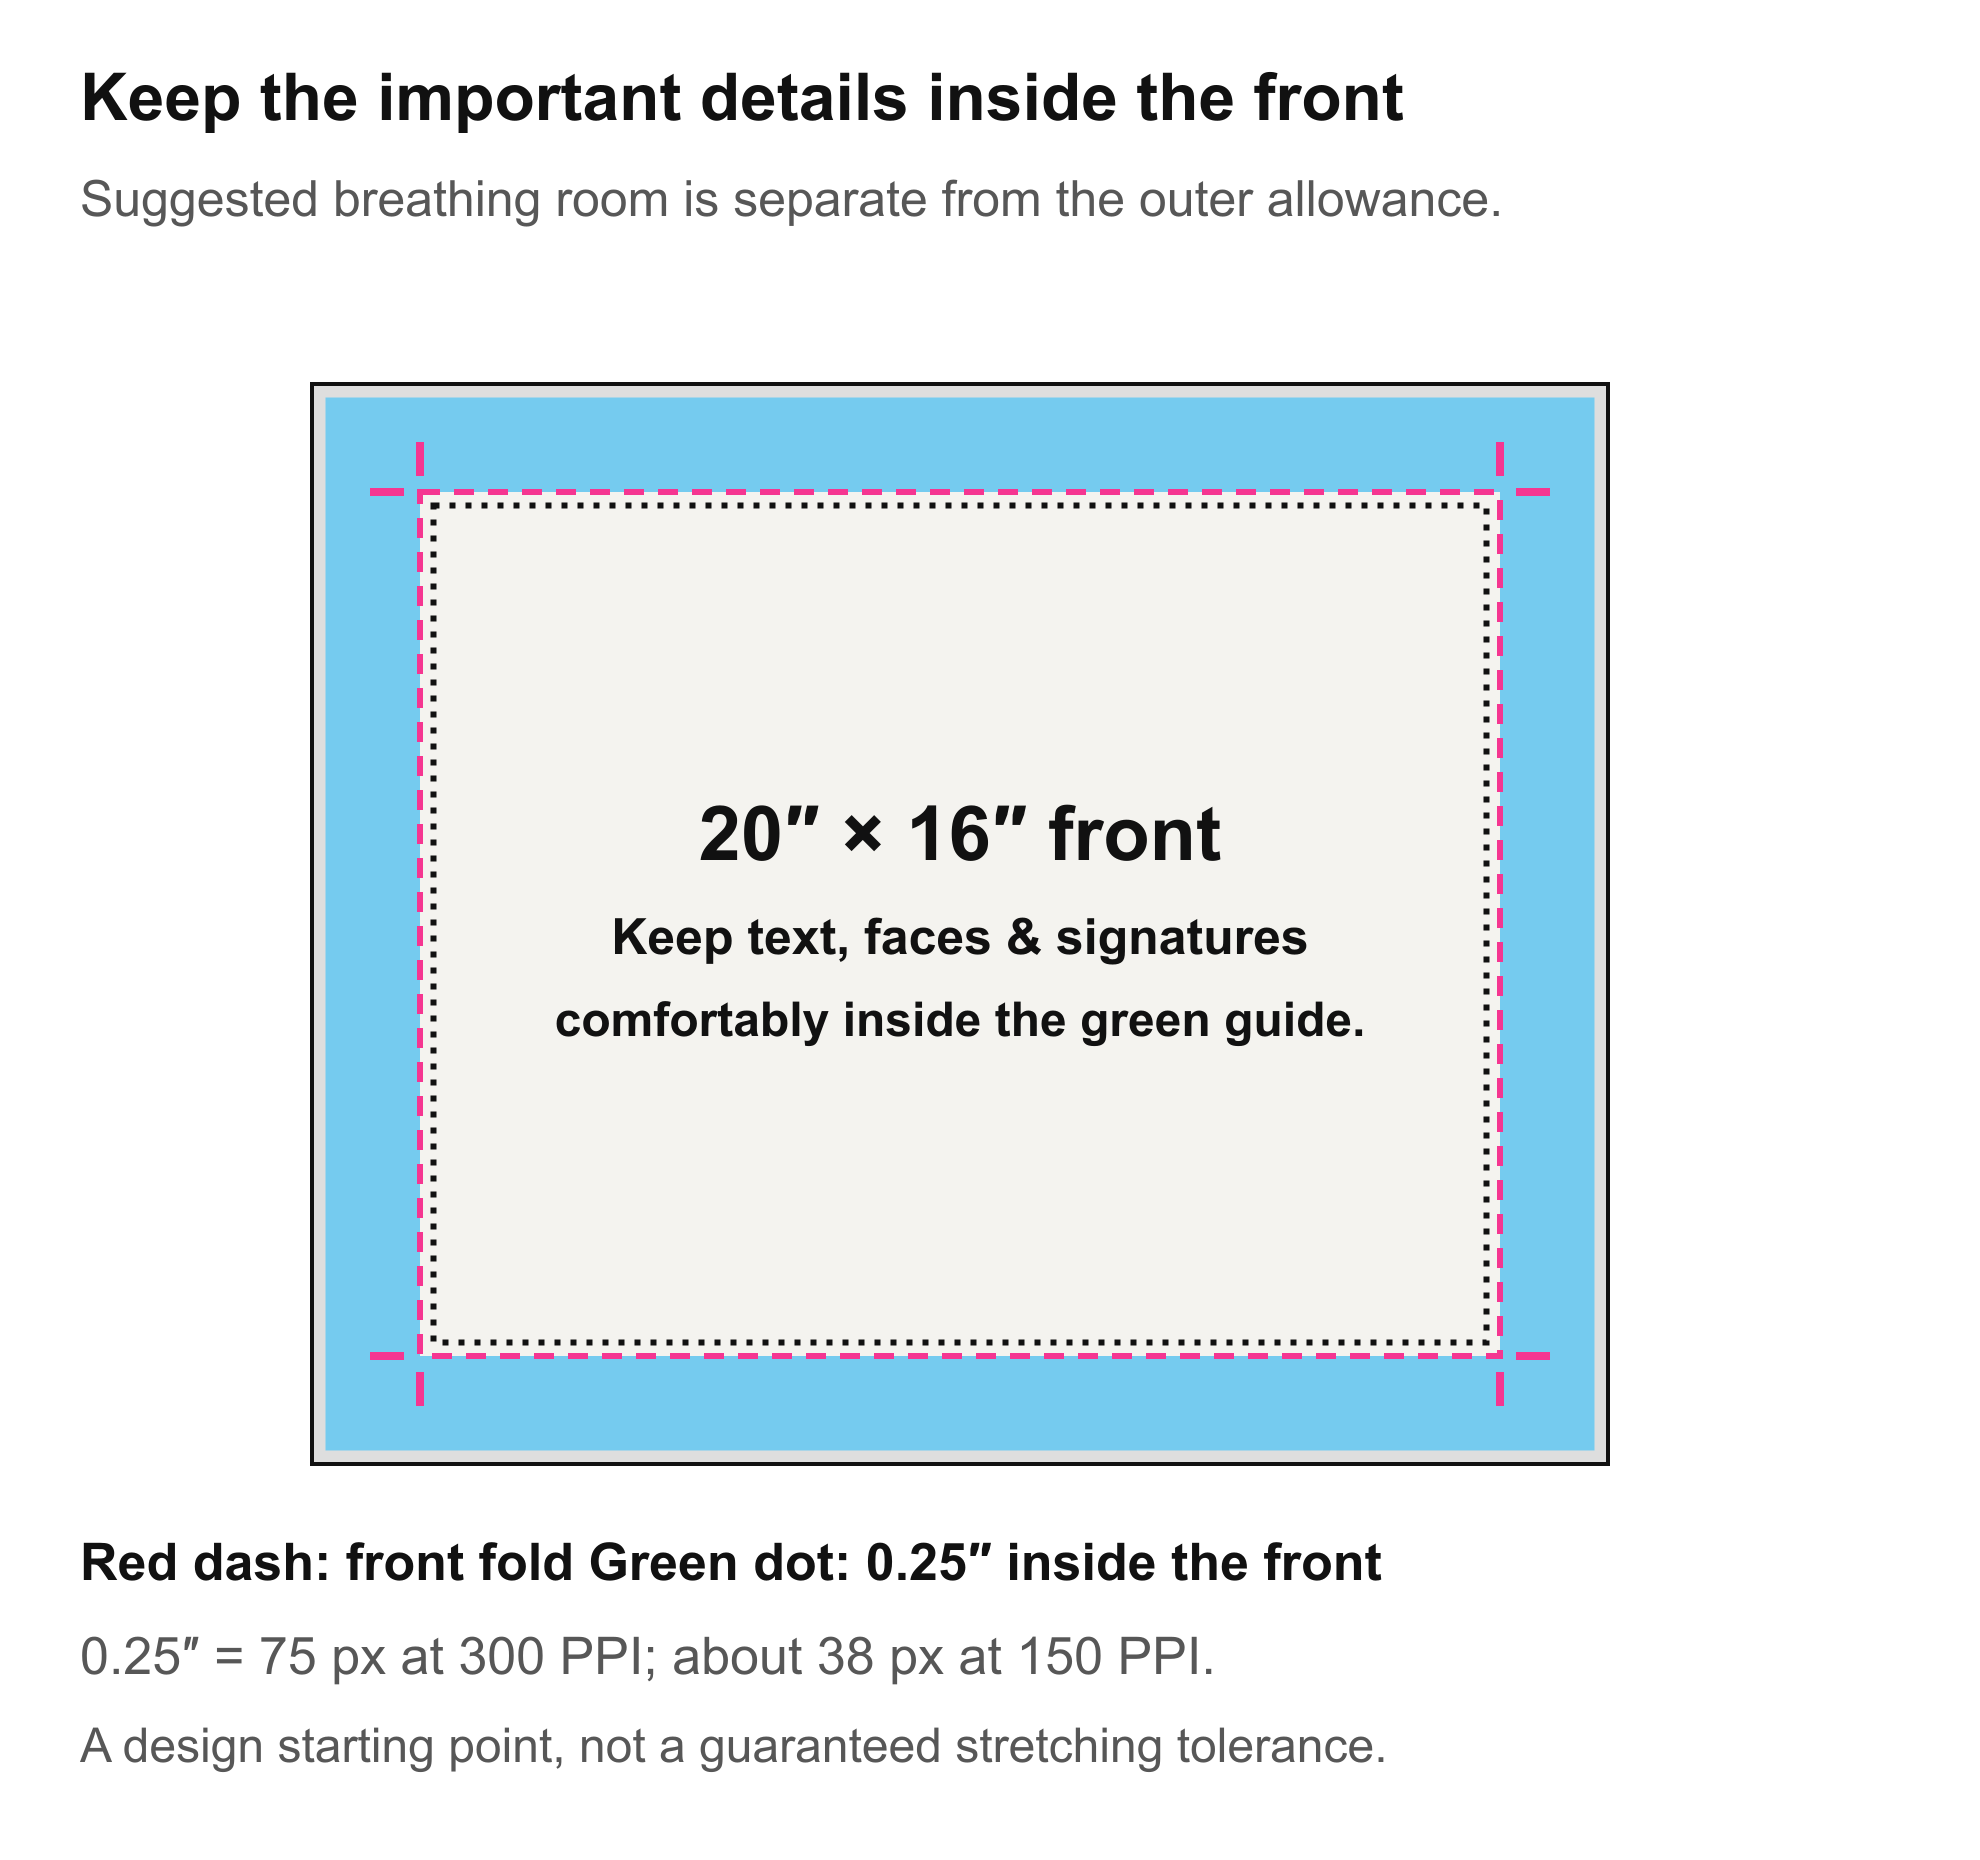
A fold guide is not an ideal place for an eye, signature or line of text. As a practical design starting point, leave at least 0.25″ / 6.35 mm of breathing room inside the front for important content, and more where the composition allows. This is a layout suggestion, not a promise of an exact production tolerance.
That inward margin is separate from the outward wrap allowance and does not increase the file size. At 300 PPI it is 75 pixels; at 150 PPI it is 37.5 pixels, so use about 38 pixels. Faces and tightly framed lettering often benefit from considerably more room.
A COMPLETE WORKED EXAMPLE
Prepare a 20″ × 16″ canvas in Photoshop
Here is the sequence for a Slim canvas with 1″ edges at 300 PPI. You can follow the same order in another editor that supports document dimensions, guides and layers; the menu names will differ.
Make a copy and choose the front crop
Open your best original and save a working copy. Set a proportional crop of 5:4 for this landscape front. Check the whole composition before committing: ears, hair, fingers, signatures and anything that matters near an edge.
If the crop tool offers a separate resolution field, leave it unset while deciding the composition. This avoids accidentally combining the crop with an enlargement.
Check the pixels you have after cropping
Open Image > Image Size. With Resample off, examine the physical size and resolution. Setting the width to 20″ on a correctly proportioned crop shows its available PPI at 20″ × 16″. It does not create more detail.
If it already contains enough pixels, you can make the intended 6,000 × 4,800-pixel front at 300 PPI. If it does not, decide whether a different size, a suitable 150 PPI setup or a carefully assessed enlargement makes sense. Do not add pixels simply to pass a number.
Establish the final front document
The target front is 20″ × 16″ at 300 PPI: 6,000 × 4,800 pixels. Any deliberate resampling should be a separate, considered step. Inspect the result and keep the untouched source.
Add space around it with Canvas Size
Choose Image > Canvas Size, use the centre anchor, and set the complete document to 22″ × 18″. This adds room around the front without stretching the front image. If using the Relative option instead, add 2″ to width and 2″ to height in total; centred, that gives 1″ on each edge.
Do not put 1″ into each Relative field expecting 1″ per side: centred, a 1″ total increase gives only half an inch on each side.
Place the four front guides
Add vertical guides at 1″ and 21″, and horizontal guides at 1″ and 17″. Their pixel equivalents are x = 300 / 6,300 and y = 300 / 5,100. The rectangle between them is your 20″ × 16″ front.
Fill the new edge area
Continue suitable background, build mirrored edges, or use the solid side colour you intend. The whole 22″ × 18″ document needs deliberate artwork or colour. An accidental transparent or white strip is not a finished wrap.
Keep the chosen front crop unchanged while you construct its sides. Check the four corners too; side strips must meet cleanly.
Inspect and export a clean copy
Review both the whole image and fine detail. Remove any drawn guide layers, labels and measurement arrows. Save an editable master, then export a clean full-size copy. Reopen the exported file to check its pixel dimensions and corners.
Software references: Adobe’s Image Size instructions, Canvas Size instructions and non-printing guides. Our worked dimensions above are calculated for the stated YI2C canvas setup.
To make the Chunky version
Return to the same 20″ × 16″ front. Increase the complete document to 24″ × 20″, keeping the front centred. At 300 PPI, the file is 7,200 × 6,000 pixels. The front guides are at x = 600 / 6,600 and y = 600 / 5,400. Fill the larger edge area; do not enlarge the entire Slim file to these new dimensions.
To work at 150 PPI instead
The physical measurements remain exactly the same. The front is 3,000 × 2,400 pixels. With 1″ edges, the full document is 3,300 × 2,700; with 2″ edges, it is 3,600 × 3,000. Use the 150 PPI guide coordinates in the table above. Changing PPI changes the pixel requirement, not the amount of fabric needed around the frame.
What should you put in the extra edge area?
The allowance has to contain something intentional. Simply making the document bigger leaves you with empty space. The right treatment depends on the photograph and the finish you want.
Image or gallery wrap
The picture continues around the sides. Plan the full composition so that your intended front sits inside the guides, with additional image beyond them. If you use the outer part of an existing photograph for the sides, those details are no longer all on the front.
Do not take a tightly composed 20″ × 16″ picture and stretch it across a 22″ × 18″ document expecting the front to stay identical. The front guides will cut through a different part of that scaled picture.
Mirrored edges
A reflected strip from each front edge fills the surrounding area. This can keep the selected front composition intact. It works best when the reflected content is unobtrusive: sky, grass, walls and other relatively simple backgrounds.
Inspect recognisable objects at the fold. A reflected eye, paw, face, word or lamppost can look odd on the side. Mirror the top, bottom, left and right in the appropriate direction and check the corner joins; avoid stretching a single thin row of pixels into a blurred stripe.
White, black or another solid colour
A deliberate colour can be a cleaner choice when the photograph reaches the front edges. Fill the complete allowance and check the join against the front. If you are using a dark colour, look for stray pale pixels along the seam.
Extended background
Sometimes there is enough simple background to continue the scene. Keep the original subject intact and inspect the joins, perspective and repeated details. If a background cannot be extended convincingly, mirrored or solid-colour sides may suit the photograph better.
If you would like us to look at the edges, send the original and explain what must remain on the front. There is no need to solve every awkward corner before getting in touch.
KEEP THESE NUMBERS HANDY
Canvas size and pixel reference tables
All sizes below are landscape, written width × height. Reverse the pair for portrait. These are arithmetic references, rather than a list of every size currently sold.
| Finished front | Ratio | Front pixels at 300 PPI | Front pixels at 150 PPI |
|---|---|---|---|
| 10″ × 8″ | 5:4 | 3,000 × 2,400 | 1,500 × 1,200 |
| 12″ × 8″ | 3:2 | 3,600 × 2,400 | 1,800 × 1,200 |
| 16″ × 12″ | 4:3 | 4,800 × 3,600 | 2,400 × 1,800 |
| 16″ × 16″ | 1:1 | 4,800 × 4,800 | 2,400 × 2,400 |
| 20″ × 16″ | 5:4 | 6,000 × 4,800 | 3,000 × 2,400 |
| 24″ × 16″ | 3:2 | 7,200 × 4,800 | 3,600 × 2,400 |
| 24″ × 20″ | 6:5 | 7,200 × 6,000 | 3,600 × 3,000 |
| 30″ × 20″ | 3:2 | 9,000 × 6,000 | 4,500 × 3,000 |
The next two tables include the full edge allowance. They describe a complete, prepared wrap file, not the pixel size of the picture on the front alone.
| Finished front | Full document | Full pixels at 300 PPI | Full pixels at 150 PPI |
|---|---|---|---|
| 10″ × 8″ | 12″ × 10″ | 3,600 × 3,000 | 1,800 × 1,500 |
| 12″ × 8″ | 14″ × 10″ | 4,200 × 3,000 | 2,100 × 1,500 |
| 16″ × 12″ | 18″ × 14″ | 5,400 × 4,200 | 2,700 × 2,100 |
| 16″ × 16″ | 18″ × 18″ | 5,400 × 5,400 | 2,700 × 2,700 |
| 20″ × 16″ | 22″ × 18″ | 6,600 × 5,400 | 3,300 × 2,700 |
| 24″ × 16″ | 26″ × 18″ | 7,800 × 5,400 | 3,900 × 2,700 |
| 24″ × 20″ | 26″ × 22″ | 7,800 × 6,600 | 3,900 × 3,300 |
| 30″ × 20″ | 32″ × 22″ | 9,600 × 6,600 | 4,800 × 3,300 |
| Finished front | Full document | Full pixels at 300 PPI | Full pixels at 150 PPI |
|---|---|---|---|
| 10″ × 8″ | 14″ × 12″ | 4,200 × 3,600 | 2,100 × 1,800 |
| 12″ × 8″ | 16″ × 12″ | 4,800 × 3,600 | 2,400 × 1,800 |
| 16″ × 12″ | 20″ × 16″ | 6,000 × 4,800 | 3,000 × 2,400 |
| 16″ × 16″ | 20″ × 20″ | 6,000 × 6,000 | 3,000 × 3,000 |
| 20″ × 16″ | 24″ × 20″ | 7,200 × 6,000 | 3,600 × 3,000 |
| 24″ × 16″ | 28″ × 20″ | 8,400 × 6,000 | 4,200 × 3,000 |
| 24″ × 20″ | 28″ × 24″ | 8,400 × 7,200 | 4,200 × 3,600 |
| 30″ × 20″ | 34″ × 24″ | 10,200 × 7,200 | 5,100 × 3,600 |
A-series and metric artwork
Choosing a paper or frame size? Our A paper size and frame guide includes dimensions, mount calculations and two printable reference PDFs.
Switching between measurement systems? Convert inches and centimetres before calculating your artwork size.
A paper size has its own proportions. Use its exact millimetres rather than treating an A4 as 12″ × 8″ or an A3 as 16″ × 12″. They are different dimensions and shapes.
| Front size | Exact width × height | Front pixels at 300 PPI | Front pixels at 150 PPI |
|---|---|---|---|
| A5 | 210 × 148 mm | 2,480 × 1,748 | 1,240 × 874 |
| A4 | 297 × 210 mm | 3,508 × 2,480 | 1,754 × 1,240 |
| A3 | 420 × 297 mm | 4,961 × 3,508 | 2,480 × 1,754 |
| A2 | 594 × 420 mm | 7,016 × 4,961 | 3,508 × 2,480 |
| A1 | 841 × 594 mm | 9,933 × 7,016 | 4,967 × 3,508 |
| 50 × 40 cm | 500 × 400 mm | 5,906 × 4,724 | 2,953 × 2,362 |
Those metric pixel figures are for the front only and are rounded to the nearest whole pixel. Add 50.8 mm to both full document dimensions for 1″ edges, or 101.6 mm for 2″ edges. For example, a landscape A4 front is 297 × 210 mm: its prepared Slim document is 347.8 × 260.8 mm.
Where rounding creates a one-pixel difference, use the physical guide positions to keep the front centred. A one-pixel rounding adjustment is different from changing the ordered canvas size.
Save the file without undoing your preparation
Keep an editable master with layers, live text and non-printing guides. Make a separate clean copy to send. A high-quality JPEG is a practical option for a photographic image; use the file types currently accepted by the creator, or arrange a different format with us by email.
If you are designing from scratch, sRGB is a sensible general RGB working choice. Preserve an existing embedded colour profile when saving a photograph; if a file uses a specialist profile or your colour requirements are critical, send that information with it. Do not convert to an arbitrary CMYK profile just because the artwork is being printed.
Check that export has not reduced the image to a web-size preset. Reopen the actual saved file and check the pixels again. For our 20″ × 16″ Slim example at 300 PPI, you should still have 6,600 × 5,400 pixels, even if the export no longer displays the PPI metadata as you expected.
Further reading: Adobe’s guides to saving a JPEG, embedding a colour profile and working colour profiles for print.
Watch for transparent areas, unwanted borders, a stray drawn guide, or a blank strip at a corner. Check spelling and signatures before flattening. A proof image, a screenshot of your editor and the clean print artwork should be separate files with clear names.
A useful file name
Smith-20x16in-front-Slim-1in-edges-300ppi.jpg
That records the finished front, depth, allowance and resolution. The file name should agree with the actual file; renaming a 2,000-pixel picture “300ppi” will not change its contents.
What to tell us with a prepared file
Use the creator’s Email option and send the file, or a full-resolution download link, to sales@yourimage2canvas.co.uk. Include your order number when you have one. A short note like this removes a lot of uncertainty:
Finished front: 20″ wide × 16″ high.
Profile: 0.75″ Slim.
Artwork already includes 1″ on every edge.
Full file: 22″ × 18″, 6,600 × 5,400 pixels at 300 PPI.
Edge treatment: mirrored sides.
Please keep the indicated front crop; do not generate another wrap from the whole expanded image.
I have attached the clean artwork and a separate annotated reference.
Change those details to match your own file. If you cannot get the ordering preview to show your intended front correctly, contact us before paying so we can agree how it should be handled.
The mistakes that are easiest to avoid
| Mistake | What to do |
|---|---|
| Adding 1″ once to the width | Add it on both sides: the width increases by 2″, and so does the height. |
| Treating 2″ as the total across both edges | For Chunky, allow 2″ at each edge: add 4″ to width and height. |
| Adding rear allowance again | The stated 1″ or 2″ already includes 0.25″ towards the rear. |
| Counting the wrap as part of the ordered front | Order the finished front size and identify the larger file as prepared artwork. |
| Changing 72 to 300 and assuming quality improved | Check actual pixels after the crop and inspect the photograph. |
| Cropping after making the wrap | Decide the front crop first, then construct its sides. |
| Enlarging the whole Slim file to make Chunky | Return to the same front and build the larger allowance around it. |
| Flattening fold lines into the picture | Export clean artwork; keep the annotated reference separate. |
| Using canvas allowance for a poster | Flat prints need their own preparation instructions. |
| Judging quality by megabytes alone | Compare pixel dimensions, crop, sharpness and visible detail. |
Download the printable canvas sizing reference (PDF)
A last look before you send it
- The finished width, height, units and orientation match the order.
- The front crop is the shape you want, without stretched proportions.
- The 1″ or 2″ allowance is present on all four edges if you are supplying a complete wrap.
- Important faces, lettering and signatures sit comfortably inside the front guides.
- The wrap and corners are filled deliberately, without blank or transparent gaps.
- The saved file has the intended pixels and contains no drawn guide marks.
- Your message identifies prepared artwork and states the finished front size.
- You have kept the original and an editable master.
If the numbers are right but the picture still looks soft, stop there and send us the original. Correct measurements help us make the canvas you intended; they do not replace the detail a good print needs.
A FEW MORE THINGS PEOPLE ASK
Canvas file preparation questions
Do I have to resize my photograph before ordering?
No. For a normal photo order, send the highest-quality original and use the creator to choose the finished size, crop and sides. The full wrap instructions are for people who want to prepare that artwork themselves.
Should every canvas file be 300 DPI?
300 PPI is a useful target where the original supports it. A suitable 150 PPI file can work for canvas, but the actual photograph, crop, size and viewing distance matter. A larger pixel count cannot make a blurred original sharp.
How big can I print a 3,000 × 2,400 image?
Its 5:4 shape corresponds to 10″ × 8″ at 300 PPI or 20″ × 16″ at 150 PPI, before any change in crop. Those figures describe the front if those pixels are used on the front. A complete file with wrap needs additional pixels outside it.
What size file do I need for a 12″ × 8″ canvas?
The front is 3,600 × 2,400 pixels at 300 PPI, or 1,800 × 1,200 at 150 PPI. A full Slim file with 1″ edges is 14″ × 10″; a full Chunky file with 2″ edges is 16″ × 12″. See the complete pixel tables above.
Are 1″ and 2″ the depths of your canvas frames?
No. They are the artwork allowances per edge used in this guide. They correspond to our 0.75″ Slim and 1.75″ Chunky profiles, with a 0.25″ rear allowance already included.
Will a deeper frame make the picture on the front smaller?
The intended front stays the ordered size. A deeper frame needs more artwork around it. With a prepared file, preserve the same front and add the larger allowance. With image wrap from an existing photograph, check what the chosen crop places on the front and sides.
Should I leave the crop marks in my final image?
No. The marks in this guide explain the front and folds. Use non-printing guides in your editor, remove drawn marks from the clean export, and send a separate annotated reference if needed.
Does a 10 MB file guarantee a better print than a 2 MB file?
No. File size depends on the format, compression and contents. Check the pixels, visible detail and final crop. Enlarging or saving an image in a bulkier format does not prove that it contains better detail.
Can I make my design in another editor?
Yes. The same maths applies if the editor lets you set the correct physical size or pixels and position the front precisely. Inspect the exported file rather than relying only on a “print quality” preset. If it cannot manage the wrap reliably, send the front and explain the finish you want.
How do I check quality on screen?
Use the whole-image view to judge composition and a 100% pixel view to inspect defects. Neither is automatically a true physical print preview: screen size, scaling and pixel density affect it. For a critical result, ask us to assess the original at the intended size.
Can the same prepared file be used for a poster?
Use the front artwork for a flat print and follow that product’s requirements. A canvas wrap contains extra material intended for the sides and rear. Printed flat without adjustment, that allowance would appear around the picture.
What if I am still unsure?
Email the original photograph and tell us the front size, orientation and finish you have in mind. If you have already prepared a version, include it and explain the allowance used. We can look at the actual files rather than guess from a screenshot.
READY WHEN YOU ARE
Make the picture yours.
We’ll make the canvas.
Choose your photograph, tell us what matters, and we will help you get it ready for print.
Create your canvas →Ask about your file